Content from Introduction
Last updated on 2025-06-28 | Edit this page
Overview
Questions
- What are the FAIR research principles?
- How do FAIR principles apply to software?
- How does folder organisation help me?
Objectives
- Explain the FAIR research principles in the context of research software
- Explain how file management helps in being FAIR
- Understand elements of good naming strategy
FAIR principles
FAIR stands for Findable, Accessible, Interoperable, and Reusable and comprises a set of principles designed to increase the visibility and usefulness of your research to others. FAIR principles have been applied for software, here is a brief concept translation:
Findable
- Create a description of your software to make it discoverable by search engines and other search tools
- Use a unique and persistent identifier (DOI) for your software (e.g. by depositing your code on Zenodo, OSF, GitHub)
Accessible
- The code and its description (metadata) has to be available even when the software is no longer actively developed (this includes earlier versions of the software)
Interoperable
- Use community-agreed standard formats for inputs and outputs of your software and its metadata
Reusable
- Document your software (including its functionality, how to install and run it) so it is both usable (can be executed) and reusable (can be understood, modified, built upon, or incorporated into other software)
- Give a licence to your software clearly stating how it can be reused
Task 1.1

The Turing Way project illustration by Scriberia. Used under a CC-BY 4.0 licence. DOI: 10.5281/zenodo.3332807.
Join Menti: https://www.menti.com/alg8a76zkfgp
File Naming
There is no single way to manage file naming, but consistency is key. Here’s a couple of options, and ways you can combine approaches:
| Case Convention | Example |
|---|---|
| Pascal Case | PascalCase |
| Camel Case | camelCase |
| Snake Case | snake_case |
| Kebab Case | kebab-case |
| Flat Case | flatcase |
| Upper Flat Case | UPPERFLATCASE |
| Pascal Snake Case | Pascal_Snake_Case |
| Camel Snake Case | camel_Snake_Case |
| Screaming Snake Case | SCREAMING_SNAKE_CASE |
It’s good practice to mention your file naming convention in your data management plan and/or meta data.
- Choose a convention and apply it consistently
- Use descriptive names
- Optional: Tap into default ordering
- Optional: Build file naming in your workflow
Task 1.2
Before we dive into the details, let’s look at some examples of file names, and come up with suggestions to improve clarity and functionality.
| 🔨 Needs work | ✔️ Suggestion |
|---|---|
School123 Period1.RDS |
|
period1_school123_A_ITER2_CONVERGED_SIM.RDS |
|
school123_period1_I_goodness_fit.png |
| 🔨 Needs Edits | ✔️ Suggestion |
|---|---|
School123 Period1.RDS |
school123_period1.RDS |
period1_school123_A_ITER2_CONVERGED_SIM.RDS |
school123_period1_A_ITER2_CONVERGED_SIM.RDS |
school123_period1_I_goodness_fit.png |
school123_period1_I_gof.png |
Default ordering
To create a default ordering, we can add a number or date at the
beginning of file names. This keeps our files sorted in ascending order
based on file versions or in chronological order. If your file name
starts with a number, we recommend left padding them with zeros, because
your computer will order 003 < 004 < 020 < 100 as
opposed to 100 < 20 < 3 < 4. If you need to
re-order your files at a later point, you may be tempted to re-name all
of your files. It is best to use a template from the start to avoid
running into this mess.
There are certain conventions that apply to file naming, ex. if you
need to use a date then file names can start with
year-month-day (for example 2020-02-21). We
recommend using something like the ISO 8601 standard:
YYYY-MM-DD for dates.
Dynamically generated
Output in multiple forms can be generated as part of running a
computational pipeline. Result files can contain a key identifier or
label, depending on your unit of analysis. Workflow managers offer
important scaffolding to support how you track the
flows of inputs and outputs across multiple stages of a
pipeline. The identifier may well be a pseudonym if your project works
with confidential data. We can come back to this to see how we can
assign handy process labels in our workflow with base functions
like paste0() in R statistical software. This way
we can concatenate literal words or values with ones that depend on the
input flowing into a process.
Adapting a Workflow
A repository (or a “repo”) is a storage location for your research project. A repository can contain a range of digital objects and can be used to store your project by using online platforms such as GitHub. The aim of a repository is to organise your project in such a way that is both accessible to others and efficient to use.
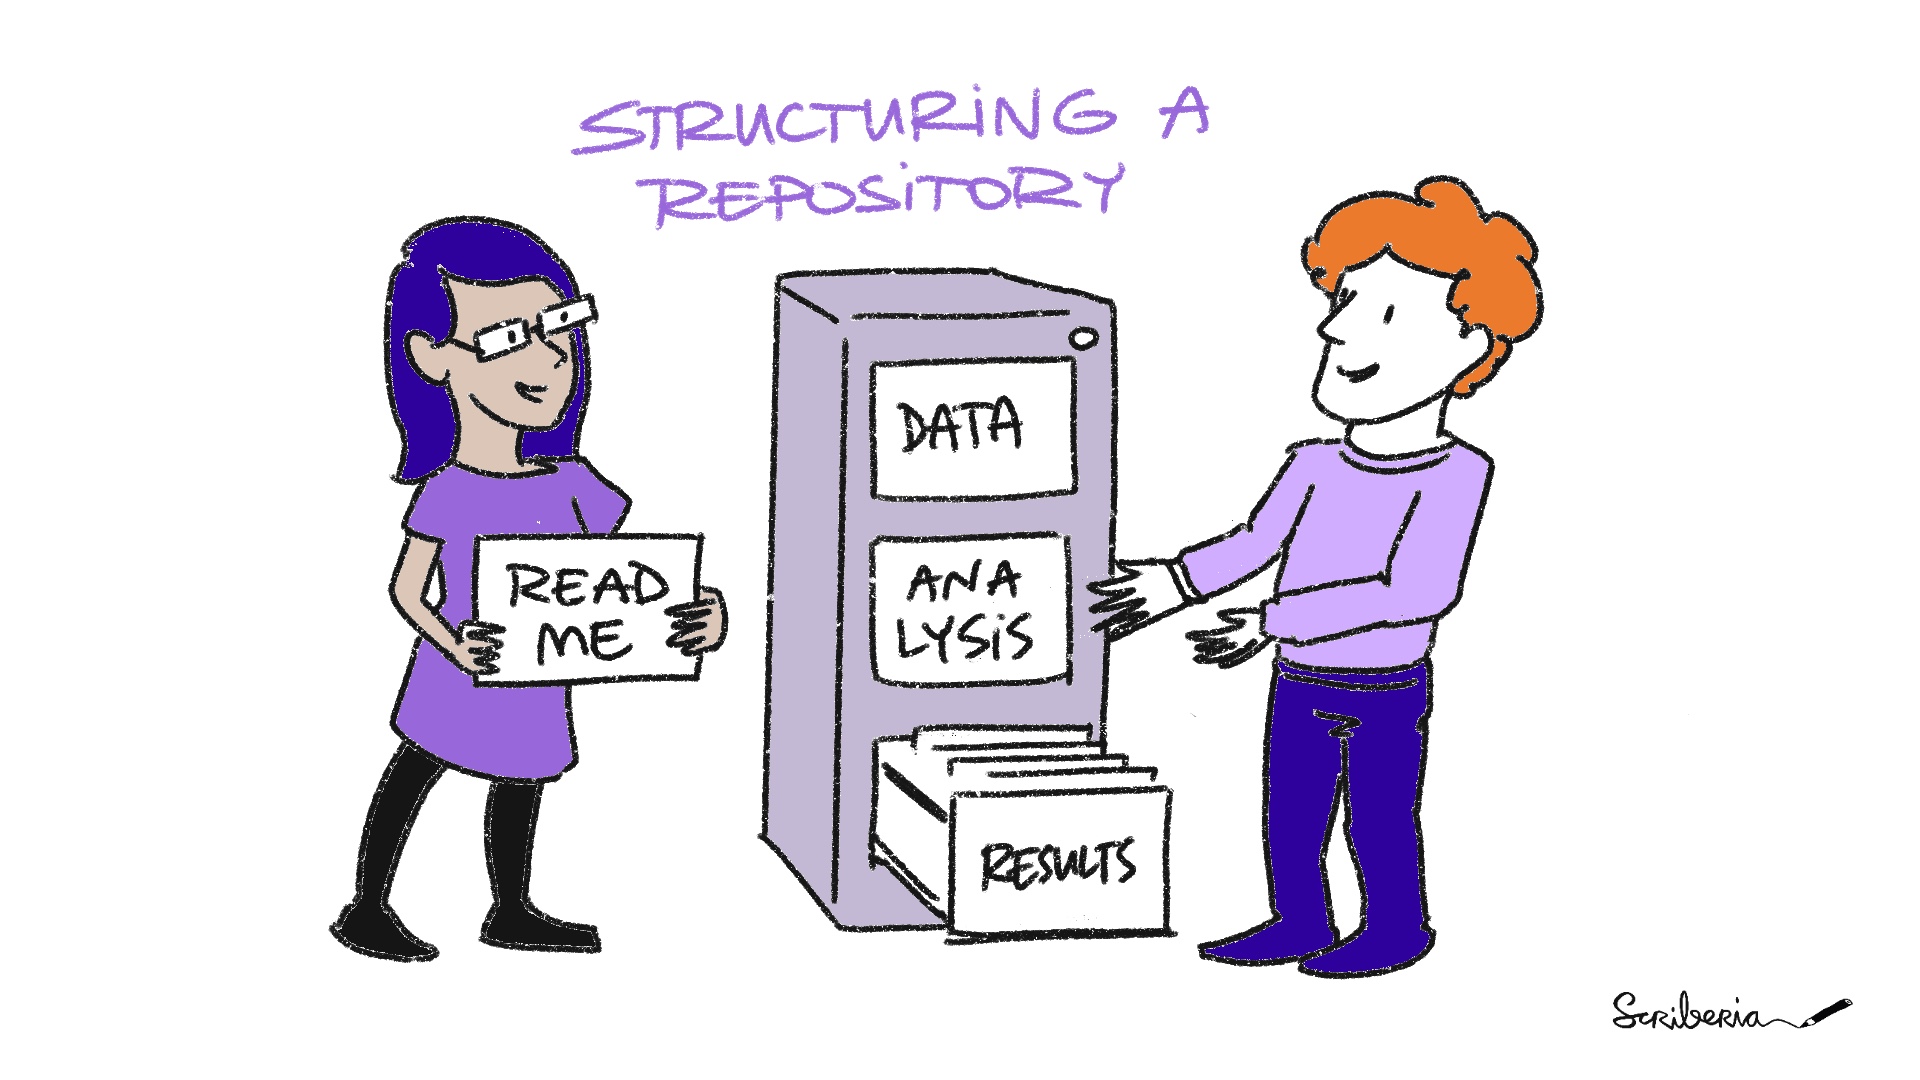
So far, we saw the key documents that one should add when starting or setting up a project repository. If you are following along, navigate to repo-boilerplate.
Example for a Research Project
A good way to map the organisation of folders within your directory is using a file tree.
Task 1.3
Here are some suggestions on the files and folders your workflow should have, you can download the template for the folder here:
Project folder
└── 📁workflow                <- Main workflow directory
  └── 📁apptainer          <- Container definitions for Apptainer (formerly Singularity)
  └── 📁bin                 <- Executable scripts used in the workflow, ex. in R these would be functions
  └── 📁conf               <- Configuration files for different execution environments
  └── 📁data               <- Input data files for the workflow
  └── 📁docker             <- Docker container definition and dependencies
  └── 📁docs               <- Documentation, reports, and visualizations
  └── 📁modules            <- Nextflow modules for different analysis steps
  └── 📁params             <- Parameter files for the workflow
  └── 📁templates          <- Template scripts used in the workflow
  └── .dockerignore        <- Files to exclude from Docker builds
  └── .gitignore           <- Files to exclude from Git version control
  └── main.nf              <- Main Nextflow workflow definition
  └── nextflow.config      <- Main Nextflow configuration
  └── params.config        <- Parameter configuration
└── README.md <- Project documentationStep 1: Follow the link to repo-boilerplate to navigate to the code repository.
Step 2: Click on the code tab to download the folders for the workflow.
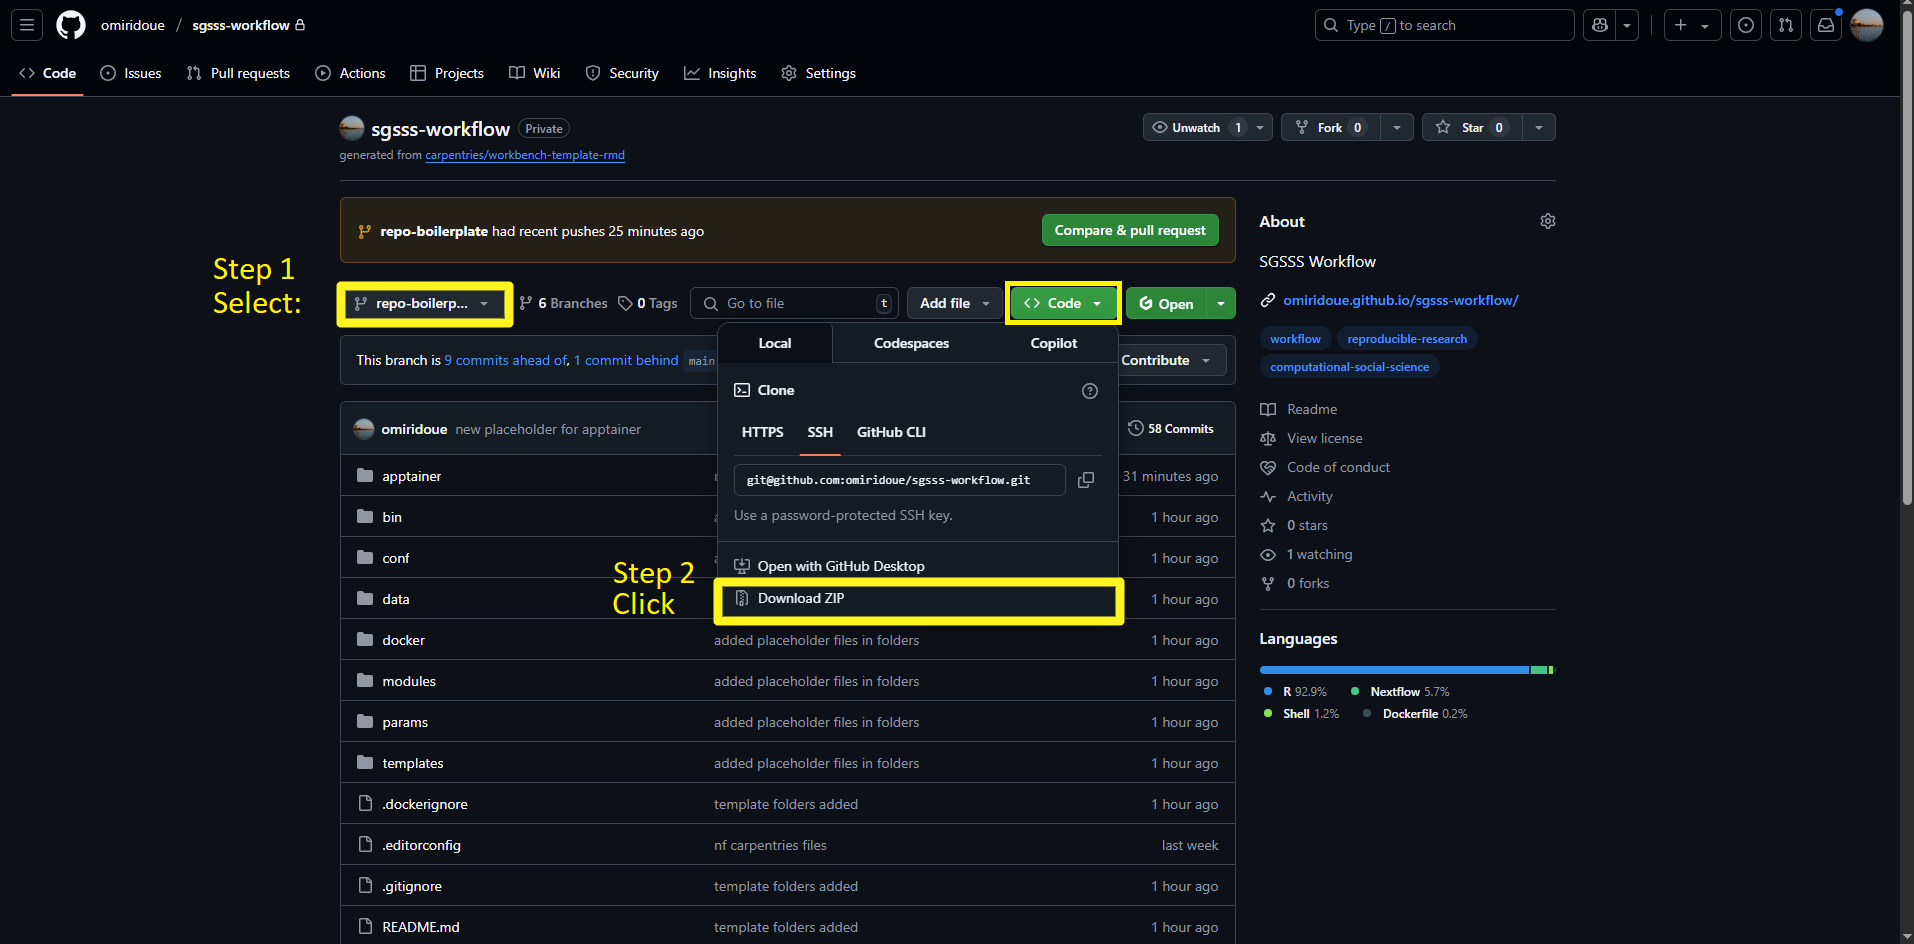
Alternatively, you can use git to download the code for the specific branch, with the following code:
Example repositories
- Name your files consistently
- Keep it short but descriptive
- Share/establish a naming convention when working with collaborators
- Consider generating output file names dynamically
- Avoid special characters or spaces to keep it machine-compatible
- Use capitals or underscores to keep it human-readable
- Use consistent date formatting, for example ISO 8601:
YYYY-MM-DDto maintain default order - Include a version number when applicable
- Record a naming convention in your data management plan
Content from Hello Nextflow
Last updated on 2025-07-12 | Edit this page
Overview
Questions
- What is Nextflow?
- Why should I use a workflow management system?
- What are the features of Nextflow?
- What are the main components of a Nextflow script?
- How do I run a Nextflow script?
Objectives
- Understand a workflow management system.
- Understand the benefits of using a workflow management system.
- Explain the components of a Nextflow script.
- Run a Nextflow script.
Workflows
Analysing data involves a sequence of tasks, including gathering, cleaning, and processing data. This is what we refer to as data wrangling. This is an important part of research and something that should be documented. The sequence of tasks that picks up from the point that the data is ready to work with is a workflow or a pipeline. These workflows typically require using multiple software packages, sometimes running on different computing environments, such as desktop or a compute cluster. However, as workflows become larger and more complex, the management of the programming logic and software becomes difficult. Workflow Management Systems have been developed specifically to manage computational data-analysis workflows.
Workflow management systems
Reproducibility: Nextflow supports several container technologies, such as Docker and Singularity, as well as the package manager Conda. This, along with the integration of the GitHub code sharing platform, allows you to write self-contained pipelines, manage versions and to reproduce any previous result when re-run, including on different computing platforms.
Portability & interoperability: Nextflow’s syntax separates the functional logic (the steps of the workflow) from the configuration (how the scripts run). This allows the pipeline to be run on multiple platforms, e.g. local compute vs. a university compute cluster or a cloud service like AWS, without changing the steps of the workflow.
Simple parallelism: Nextflow is based on the dataflow programming model which greatly simplifies the splitting of tasks that can be run at the same time (parallelisation).
Continuous checkpoints & re-entrancy: All the intermediate results produced during the pipeline execution are automatically tracked. This allows you to resume its execution from the last successfully implemented step, no matter what the reason was for it stopping.
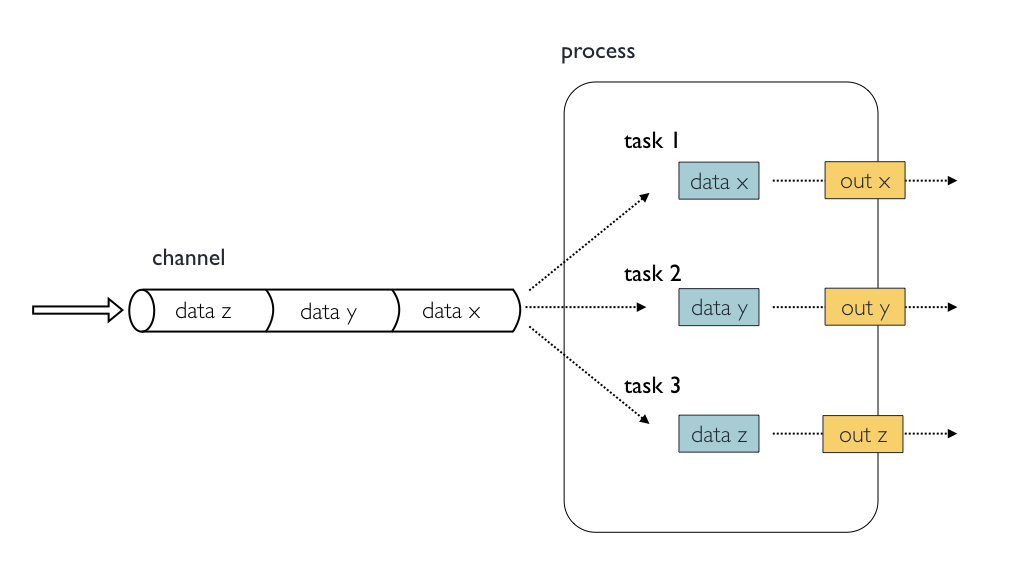
Processes, channels, and workflows
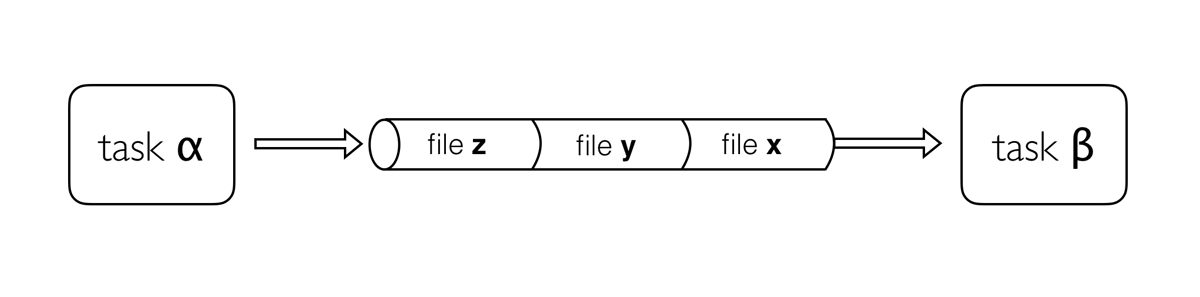
Nextflow workflows have three main parts: processes, channels, and workflows.
Processes describe a task to be run. A process script can be written in any scripting language that can be implemented by the Linux platform (Bash, Perl, Ruby, Python, R, etc.). Processes spawn a task for each complete input set. Each task is implemented independently and cannot interact with other tasks. The only way data can be passed between process tasks is via asynchronous queues, called channels.
Processes define inputs and outputs for a task. Channels are then used to manipulate the flow of data from one process to the next.
The interaction between processes, and ultimately the pipeline execution flow itself, is then explicitly defined in a workflow section.
Independent instances (tasks) of a process are run in parallel. Each task generates an output, which is passed to another channel and used as input for the next process. We’ll figure out how this works with some of the practice examples in the following sections.
Workflow implementation
While a process defines what command or script has to be
implemented, the runtime profile determines how that script
is actually run in the target system. If not otherwise specified,
processes are implemented on the local computer. The local runtime
profile is very useful for pipeline development, testing, and
small-scale workflows, but for large-scale computational pipelines, a
High Performance Cluster (HPC) or Cloud platform is often required.
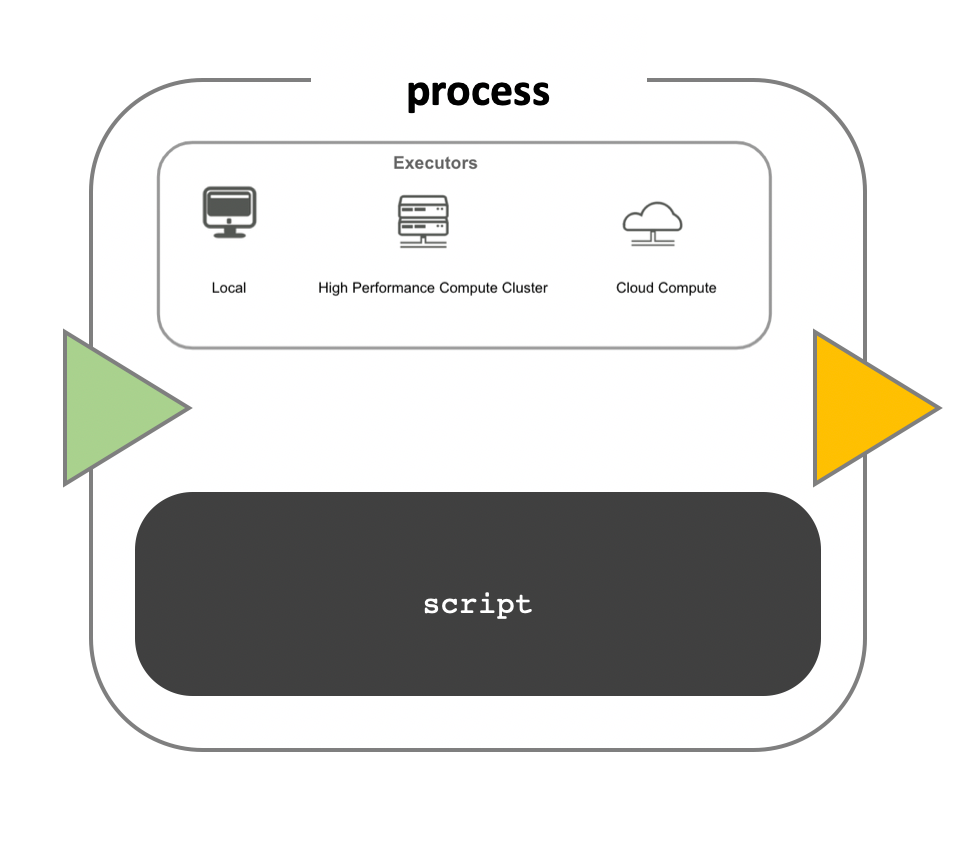
Runtime
Nextflow provides a separation between the pipeline’s functional logic and the underlying execution platform. This makes it possible to write a pipeline once, and then run it on your computer, compute cluster, or the cloud, without modifying the workflow, by defining the target platform in a configuration file. Note multiple configurations can be defined, and the choice is left to the user, a full list can be found here.
Your first script
We are now going to look at a sample Nextflow script that extracts a
folder with data files. First step involves navigating to the relevant
script, 02_hello_nextflow.nf in the current directory. The
instructions to set up the code material can be found under setup.
Task 2.1
The nextflow scripts for each lesson episode are available in the
scripts directory created during the course setup. Open the
02_hello_nextflow.nf script and consider each section of
the script.
Hint: Check that your terminal displays the following file path:
Use the cd command to change directory followed by the
folder name or relative path you want to navigate to, ex.
cd sgsss-workflow. If you want to go back up a level or
folder in your directory, you can type cd ..
This is a Nextflow script, which contains the following:
- An optional interpreter directive (“Shebang”) line, specifying the location of the Nextflow interpreter.
- A multi-line Nextflow comment, written using C style block comments, there are more comments later in the file.
- A pipeline parameter
params.inputwhich is given a default value, of the relative path to the location of a compressed archive of data, as a string. - A Nextflow channel
input_chused to read in data to the workflow. - An unnamed
workflowexecution block, which is the default workflow to run. - A call to the process
GENERATE_READS. - An operation on the process output, using the channel operator
.view(). - A Nextflow process block named
GENERATE_READS, which defines what the process does. - An
inputdefinition block that assigns theinputto the variableread, and declares that it should be interpreted as a file path. - An
outputdefinition block that uses the Linux/Unix standard output stream with file path from the script block. - A script block that contains the bash commands
printf '${targz}\\t'andtar -xzf $targz.
Running Nextflow scripts
To run a Nextflow script use the command
nextflow run <script_name>.
You should see output similar to the text shown below:
OUTPUT
 N E X T F L O W   ~  version 24.10.4

Launching `02_hello_nextflow.nf` [frozen_booth] DSL2 - revision: 8a3d1bb9c7

executor >  local (1)
[52/af3b5c] GENERATE_READS (1) [100%] 1 of 1 ✔
[/workspaces/training/work/52/af3b5ca0b401d80915bf823d321a7f/school123_period1.RDS, /workspaces/training/work/52/af3b5ca0b401d80915bf823d321a7f/school123_period2.RDS, /workspaces/training/work/52/af3b5ca0b401d80915bf823d321a7f/school124_period1.RDS, /workspaces/training/work/52/af3b5ca0b401d80915bf823d321a7f/school124_period2.RDS, /workspaces/training/work/52/af3b5ca0b401d80915bf823d321a7f/school125_period1.RDS, /workspaces/training/work/52/af3b5ca0b401d80915bf823d321a7f/school125_period2.RDS, /workspaces/training/work/52/af3b5ca0b401d80915bf823d321a7f/school126_period1.RDS, /workspaces/training/work/52/af3b5ca0b401d80915bf823d321a7f/school126_period2.RDS, /workspaces/training/work/52/af3b5ca0b401d80915bf823d321a7f/school127_period1.RDS, /workspaces/training/work/52/af3b5ca0b401d80915bf823d321a7f/school127_period2.RDS, /workspaces/training/work/52/af3b5ca0b401d80915bf823d321a7f/school128_period1.RDS, /workspaces/training/work/52/af3b5ca0b401d80915bf823d321a7f/school128_period2.RDS]- The first line shows the Nextflow version number.
- The second line shows the run name
frozen_booth(adjective and scientist name) and revision id8a3d1bb9c7. - The third line tells you the process has been implemented locally
(
executor > local). - The next line shows the process id
52/af3b5c, process name, number of cpus, percentage task completion, and how many instances of the process have been run. Each instance is listed sequentially and separated by a,to demonstrate the flow of data as inputs. - The final line is the output of the
.view()operator.
Quick recap
- A workflow is a sequence of tasks that process a set of data, and a workflow management system (WfMS) is a computational platform that provides an infrastructure for the set-up, execution and monitoring of workflows.
- Nextflow scripts comprise of channels for controlling inputs and outputs, and processes for defining workflow tasks.
- You run a Nextflow script using the
nextflow runcommand.
Specifying an output directory in the script
To specify an output directory for a script use the parameter
publishDir in the definition of a process.
Task 2.3
Let’s edit the 02_hello_nextflow.nf script and specify
the output directory, where we want Nextflow to store data files that
were the result of decompressing the tar archive
folder.
The files that are extracted from the archive are stored in the
folder work that tracks the different tasks that are
launched as part of the pipeline. If we want a local copy of files that
are decompressed we can add an output directory with the following
code:
Note: You should always add a sensible default value to the pipeline parameter.
GROOVY
// 02_hello_nextflow.nf
process GENERATE_READS {

  input:
          path targz

  publishDir "$projectDir", mode: "copy", overwrite: true

  output:
          path "*"

  script:
          """
          tar -xzf $targz
          # Print file name
          printf '${targz}\\t'
          """
}
Here we’ve added the output directory "$projectDir" in
the process GENERATE_READS.
This step, publishDir "$projectDir", will add a
directory to output the decompressed files. The set of options that can
be specified are listed in the Nextflow
documentation. To access the value inside the process definition we
use $parameter syntax e.g. $projectDir.
You can also try to tweak the parameter, and specify a sub-folder
called tmp that will store the output of the process
"$projectDir/tmp".
The new line of code should read:
publishDir "$projectDir/tmp", mode: "copy", overwrite: true
How would this change where the output is stored?
- A workflow is a sequence of tasks that process a set of data.
- A workflow management system (WfMS) is a computational platform that provides an infrastructure for the set-up, execution and monitoring of workflows.
- Nextflow scripts comprise of channels for controlling inputs and outputs, and processes for defining workflow tasks.
- You run a Nextflow script using the
nextflow runcommand.
Content from Parameters
Last updated on 2025-06-28 | Edit this page
Overview
Questions
- How can I change the data a workflow uses?
- How can I parameterise a workflow?
- How can I add my parameters to a file?
Objectives
- Use pipeline parameters to change the input to a workflow.
- Add pipeline parameters to a Nextflow script.
- Understand how to create and use a parameter file.
In the first episode we ran the Nextflow script,
02_hello_nextflow.nf, from the command line and it
de-compressed the archive folder each_period.tar.gz that
contained synthetic data on 4 individual schools for two time points. To
change the input to script we can make use of pipeline parameters.
Pipeline parameters
The Nextflow 02_hello_nextflow.nf script defines a
pipeline parameter params.input. Pipeline parameters enable
you to change the input to the workflow at runtime, via the command line
or a configuration file, so they are not hard-coded into the script.
Pipeline parameters are declared in the workflow by prepending the
prefix params, separated by the dot character, to a
variable name e.g., params.input.
Their value can be specified on the command line by prefixing the
parameter name with a double dash character, e.g.,
--input.
In the script 02_hello_nextflow.nf the pipeline
parameter params.input was specified with the file path
"data/each_period.tar.gz".
Task 3.1
The input for data can be passed with the
--variable_name convention. In this case we used a named
input for our parameter. Note variables can also be specified through
the command line using two dashes. Any other options would normally be
specified using a single dash, this includes the -resume
tag which is important for code development, we can come back to it in a
later section.
To process a different file,
e.g. data/multi_period.tar.gz, in the
02_hello_nextflow.nf script we would run:
OUTPUT
 N E X T F L O W   ~  version 24.10.4

Launching `02_hello_nextflow.nf` [loving_brenner] DSL2 - revision: 8a3d1bb9c7

executor >  local (1)
executor >  local (1)
[49/214249] process > GENERATE_READS (1) [100%] 1 of 1 ✔
[/workspaces/training/sgsss-workflow/scripts/work/49/21424945038a3a509a67cf9d092711/school123.RDS,
/workspaces/training/sgsss-workflow/scripts/work/49/21424945038a3a509a67cf9d092711/school124.RDS,
/workspaces/training/sgsss-workflow/scripts/work/49/21424945038a3a509a67cf9d092711/school125.RDS,
/workspaces/training/sgsss-workflow/scripts/work/49/21424945038a3a509a67cf9d092711/school126.RDS]
We can also use wild cards to specify multiple input files (This will
be covered in the channels episode). In the example below we use the
* to match any sequence of characters before
data/multi_period.tar.gz. Note: If you use
wild card characters on the command line you must enclose the value in
quotes.
This runs the process GENERATE_DAT twice, once for each file it matches.
OUTPUT
 N E X T F L O W   ~  version 24.10.4

Launching `02_hello_nextflow.nf` [grave_hopper] DSL2 - revision: 8a3d1bb9c7

executor >  local (2)
[5f/7df89f] process > GENERATE_READS (2) [100%] 2 of 2 ✔
[/workspaces/training/sgsss-workflow/scripts/work/df/253fc08b9b2941144e0e67c8e3c213/school123.dat,
/workspaces/training/sgsss-workflow/scripts/work/df/253fc08b9b2941144e0e67c8e3c213/school124.dat,
/workspaces/training/sgsss-workflow/scripts/work/df/253fc08b9b2941144e0e67c8e3c213/school125.dat,
/workspaces/training/sgsss-workflow/scripts/work/df/253fc08b9b2941144e0e67c8e3c213/school126.dat]

[/workspaces/training/sgsss-workflow/scripts/work/5f/7df89f35cb0de22fe9eb6c91e833ed/school123.RDS,
/workspaces/training/sgsss-workflow/scripts/work/5f/7df89f35cb0de22fe9eb6c91e833ed/school124.RDS,
/workspaces/training/sgsss-workflow/scripts/work/5f/7df89f35cb0de22fe9eb6c91e833ed/school125.RDS,
/workspaces/training/sgsss-workflow/scripts/work/5f/7df89f35cb0de22fe9eb6c91e833ed/school126.RDS]
Task 3.3
Re-run the Nextflow script 02_hello_nextflow.nf by
changing the pipeline input to all files in the directory that end with
each_period.tar.gz:
The string specified on the command line will override the default value of the parameter in the script. The output will look like this:
OUTPUT
 N E X T F L O W   ~  version 24.10.4

Launching `02_hello_nextflow.nf` [lethal_cajal] DSL2 - revision: 8a3d1bb9c7

executor >  local (2)
[05/8e0aa0] process > GENERATE_READS (1) [100%] 2 of 2 ✔
[/workspaces/training/sgsss-workflow/scripts/work/05/8e0aa09cc3795d1a3fc2ed1384adf7/school123_period1.dat,
/workspaces/training/sgsss-workflow/scripts/work/05/8e0aa09cc3795d1a3fc2ed1384adf7/school123_period2.dat,
/workspaces/training/sgsss-workflow/scripts/work/05/8e0aa09cc3795d1a3fc2ed1384adf7/school124_period1.dat,
/workspaces/training/sgsss-workflow/scripts/work/05/8e0aa09cc3795d1a3fc2ed1384adf7/school124_period2.dat,
/workspaces/training/sgsss-workflow/scripts/work/05/8e0aa09cc3795d1a3fc2ed1384adf7/school125_period1.dat,
/workspaces/training/sgsss-workflow/scripts/work/05/8e0aa09cc3795d1a3fc2ed1384adf7/school125_period2.dat,
/workspaces/training/sgsss-workflow/scripts/work/05/8e0aa09cc3795d1a3fc2ed1384adf7/school126_period1.dat,
/workspaces/training/sgsss-workflow/scripts/work/05/8e0aa09cc3795d1a3fc2ed1384adf7/school126_period2.dat]

executor >  local (2)
[05/8e0aa0] process > GENERATE_READS (1) [100%] 2 of 2 ✔

[/workspaces/training/sgsss-workflow/scripts/work/07/303a7d7f5a8a582db4d9df86d68a08/school123_period1.RDS,
/workspaces/training/sgsss-workflow/scripts/work/07/303a7d7f5a8a582db4d9df86d68a08/school123_period2.RDS,
/workspaces/training/sgsss-workflow/scripts/work/07/303a7d7f5a8a582db4d9df86d68a08/school124_period1.RDS,
/workspaces/training/sgsss-workflow/scripts/work/07/303a7d7f5a8a582db4d9df86d68a08/school124_period2.RDS,
/workspaces/training/sgsss-workflow/scripts/work/07/303a7d7f5a8a582db4d9df86d68a08/school125_period1.RDS,
/workspaces/training/sgsss-workflow/scripts/work/07/303a7d7f5a8a582db4d9df86d68a08/school125_period2.RDS,
/workspaces/training/sgsss-workflow/scripts/work/07/303a7d7f5a8a582db4d9df86d68a08/school126_period1.RDS,
/workspaces/training/sgsss-workflow/scripts/work/07/303a7d7f5a8a582db4d9df86d68a08/school126_period2.RDS]
Parameter File
If we have many parameters to pass to a script it is best to create a
parameters file. The convention is for the file to be placed on the top
level of our workflow folder and for this to be named
params.config.
Task 3.4
We have created a parameter file params.config for the
workflow. Based on the intended parameter definition, what implicit
Nextflow variables could we use as part of the defintion? Notice we want
to rename our params.input to params.school_data to make our script more
specific and clear.
OUTPUT
batches                     : 1
model specification         : /workspaces/training/sgsss-workflow/scripts/params/meta.csv
school data                 : /workspaces/training/sgsss-workflow/scripts/data/each_period.tar.gz
school info                 : /workspaces/training/sgsss-workflow/scripts/params/school_info.json
composition data            : /workspaces/training/sgsss-workflow/scripts/data/composition_each_period.tar.gz
effects                     : /workspaces/training/sgsss-workflow/scripts/params/effects.csv
subgroup                    : /workspaces/training/sgsss-workflow/scripts/params/subgroup.csv
Here we use the nextflow environment variable baseDir
which is resolved by the workflow at runtime. The path to the data and
params folder is specified through use of relative file paths. Open the
params.config file to inspect the following:
GROOVY
// params.config
params {
                outdir = "${baseDir}/results"
                batches = 1
                meta = "${baseDir}/params/meta.csv"
                effects = "${baseDir}/params/effects.csv"
                subgroup = "${baseDir}/params/subgroup.csv"
                school_data = "${baseDir}/data/each_period.tar.gz"
                school_info = "${baseDir}/params/school_info.json"
                composition_data = "${baseDir}/data/composition_each_period.tar.gz"
}
To point Nextflow to this params.config file, we include
the following code includeConfig "params.config", in our
workflow configuration file.nextflow.config.
Open the 03_params.nf and check the syntax, notice we
abstract the parameterisation of the workflow from the workflow
definition. This means we no longer need to define a parameter in our
main workflow file, so long as we point nextflow to the
params.config file.
- Pipeline parameters are specified by prepending the prefix
paramsto a variable name, separated by a dot character. - To specify a pipeline parameter on the command line for a Nextflow
run use
--variable_namesyntax.
Content from Channels
Last updated on 2025-07-05 | Edit this page
Overview
Questions
- How do I move data around in Nextflow?
- How do I handle different types of input, e.g. files and parameters?
- How can I use pattern matching to select input files?
Objectives
- Understand how Nextflow manages data using channels.
- Create a value and queue channel using channel factory methods.
- Edit channel factory arguments to alter how data is read in.
Channels
Earlier we saw that channels are the way in which Nextflow sends data
around a workflow. Channels connect processes via their inputs and
outputs. Channels can store multiple items, such as values. The number
of items a channel stores, determines how many times a process will run,
using that channel as input.
Note: When the process runs using one item from the input
channel, we will call that run a task. Each task is run in
its own self-enclosed environment.
Why use Channels?
Channels are how Nextflow handles file management, allowing complex tasks to be split up, and run in parallel.
Channels are asynchronous, which means that outputs from a set of processes will not necessarily be produced in the same order as the corresponding inputs went in. However, the first element into a channel queue is the first out of the queue (First in - First out). This allows processes to run as soon as they receive input from a channel. Channels only send data in one direction.
Channel types
Nextflow distinguishes between two different kinds of channels: queue channels and value channels.
Queue channel
Queue channels are a type of channel in which data is consumed (used up) to make input for a process/operator. Queue channels can be created in two ways:
- As the outputs of a process.
- Channel factory methods Channel.of or Channel.fromPath.
Value channels
The second type of Nextflow channel is a value channel.
A value channel is bound to a single
value. A value channel can be used an unlimited number times since its
content is not consumed.
Task 4.1
What type of channel would you use to store the following?
- Multiple values.
- A list with one or more values.
- A single value.
- A queue channels is used to store multiple values.
- A value channel is used to store a single value, this can be a list with multiple values.
- A value channel is used to store a single value.
Navigate to the nextflow file to the 04_channels.nf file (Hint: Ensure your working directory is, training/sgsss-workflow/scripts/). Again this file path will likely look different if you have set up on your local computer.
Creating Channels using Channel factories
Channel factories are used to explicitly create channels. In
programming, factory methods (functions) are a programming design
pattern used to create different types of objects (in this case,
different types of channels). They are implemented for things that
represent more generalised concepts, such as a Channel.
Channel factories are called using the
Channel.<method> syntax, and return a specific
instance of a Channel.
The value Channel factory
The value factory method is used to create a value
channel. Values are put inside parentheses () to assign
them to a channel.
- Creates a value channel and binds a string to it.
- Creates a value channel and binds a list object to it that will be emitted as a single item.
- Creates a value channel and binds a map object to it that will be emitted as a single item.
The value method can only take 1 argument, however, this can be a single list or map containing several elements.
Reminder:
- A List
object can be defined by placing the values in square brackets
[]separated by a comma. - A Map
object is similar, but with
key:value pairsseparated by commas.
To view the contents of a value channel, use the view
operator. We will learn more about channel operators in a later
section.
Queue channel factory
Queue (consumable) channels can be created using the following channel factory methods.
Channel.ofChannel.fromListChannel.fromPathChannel.fromFilePairs
The of Channel factory
When you want to create a channel containing multiple values you can
use the channel factory Channel.of. This allows the
creation of a queue channel with the values specified as
arguments, separated by a ,.
Arguments passed to the of method can be of varying
types e.g., combinations of numbers, strings, or objects. In the above
examples we have examples of both string and number data types.
Channel.from
Task 4.2
Write a Nextflow script that creates a value channel
using meta_verbose_ch as input, containing the list of
values ["all","influence","selection", "none"]. These
represent the different specifications of our models. Essentially we’d
like to conduct a set of model comparison checks by estimating a full
specification and nested sub-models. Open up the nextflow
docs to check the syntax for this.
Then print the contents of the channels using the view
operator. How many lines does the queue and value channel print?
Hint: Use the fromList(), and
value() Channel factory methods. You can also use
of() and try to compare it to fromList(), what
differences do you notice?
Notice we’ve added the following code to 04_channels.nf,
building on the previous workflow definition:
GROOVY
def meta_verbose_ch = ["all","influence","selection", "none"]

workflow {

    composition = GENERATE_READS(ZipChannel_dat)
    | flatten \
    | map { file ->
    def key = file.name.toString().split('\\.')[0]
    def school_ID = file.name.toString().split("_|\\.")[0]
    return tuple(school_ID, key, file)}

    composition \
    | view

    Channel.of(meta_verbose_ch) \
    | view

    Channel.fromList(meta_verbose_ch) \
    | view
}Channel.fromList vs Channel.of
In the above example, the channel has four elements. If you used the
Channel.of(meta_verbose_ch) it would have contained only 1 element
[all, influence, selection, none] and any operator or
process using the channel would run once.
The fromPath Channel factory
The previous channel factory methods dealt with sending general
values in a channel. A special channel factory method
fromPath is used when wanting to pass files.
The fromPath factory method creates a queue
channel containing one or more files matching a file path.
The file path (written as a quoted string) can be the location of a single file or a “glob pattern” that matches multiple files or directories.
The file path can be a relative path (path to the file from the
current directory), or an absolute path (path to the file from the
system root directory - starts with /).
Use the glob syntax to specify pattern-matching behaviour for files. A glob pattern is specified as a string and is matched against directory or file names.
- An asterisk,
*, matches any number of characters (including none). - Two asterisks,
**, works like * but will also search sub directories. This syntax is generally used for matching complete paths. - Braces
{}specify a collection of subpatterns. For example:{period1,period2}matches “period1” or “period2”
For example the script below uses the *.tar.gz pattern
to create a queue channel that contains as many items as there are files
with .tar.gz extension in the data/
folder.
Note The pattern must contain at least a star wildcard character.
You can change the behaviour of Channel.fromPath method
by changing its options. A list of .fromPath options is
shown below.
Available fromPath options:
| Name | Description |
|---|---|
| glob | When true, the characters *, ?,
[] and {} are interpreted as glob wildcards,
otherwise they are treated as literal characters (default: true) |
| type | The type of file paths matched by the string, either
file, dir or any (default:
file) |
| hidden | When true, hidden files are included in the resulting paths (default: false) |
| maxDepth | Maximum number of directory levels to visit (default: no limit) |
| followLinks | When true, symbolic links are followed during directory tree traversal, otherwise they are managed as files (default: true) |
| relative | When true returned paths are relative to the top-most common directory (default: false) |
| checkIfExists | When true throws an exception if the specified path does not exist in the file system (default: false) |
We can change the default options for the fromPath
method to give an error if the file doesn’t exist using the
checkIfExists parameter. In Nextflow, method parameters are
separated by a , and parameter values specified with a
colon :.
If we execute a Nextflow script with the contents below, it will run and not produce an output, or an error message that the file does not exist. This is likely not what we want.
Add the argument checkIfExists with the value
true.
This will give an error as there is no data directory.
Task 4.3
- Navigate to the Nextflow script file called
04_channels.nf. - The pre-populated code involves x5 queue channels. Identify the name of each of these channels. Write comments within your script to explain what this queue channel involves.
- Hint: Run the workflow script through the terminal with
nextflow run. - Hint: use the
.view()operator to print the output of the channel. Again type thenextflow runcommand to run the workflow.
GROOVY
#!/usr/bin/env nextflow

//04_channels.nf

/*
===========================================================
 pipeline for independent models runs for each schools
 for each time period, implemented in Siena
 we can then perform a meta-analysis on the results

 @authors
 Eleni Omiridou <2333157O@student.gla.ac.uk>
===========================================================
*/

/*
* Default pipeline parameters
*/

params.help            = false
params.resume          = true
cleanup = true
debug = true
log.info """
====================================================
PARAMETERS
====================================================
batches                     : ${params.batches}
model specification         : ${params.meta}
school data                 : ${params.school_data}
school info                 : ${params.school_info}
composition data            : ${params.composition_data}
effects                     : ${params.effects}
subgroup                    : ${params.subgroup}


"""

if (params.help) {
    log.info 'This is the the siena pipeline'
    log.info '\n'
    exit 1
}

/*
========================================================================================
    Workflow parameters are written as params.<parameter>
    and can be initialised using the `=` operator.
========================================================================================
*/
Channel
    .fromPath(params.meta)
    .splitCsv(header: false, sep: '\t')
    .set{ pipe_meta }

Channel
    .fromPath(params.subgroup)
    .splitCsv(header: false, sep: '\t')
    .set{ pipe_subgroup }

def map_join(channel_a, key, value){
    channel_a
        .map{ it -> [it['key'], it['value']] }
}

def flatten_estimation(channel_estimation){
    channel_estimation
        .map{ it -> [it[0], it[1], it[2], it[3][0], it[3][1], it[3][2], it[3][3], it[4][0], it[4][1], it[4][2], it[4][3], it[5][1]] }
}

// Create a channel for values
Channel
    .fromPath(params.effects)
    .splitCsv(header: false)
    .map { row -> [row[0], row[1], row[2..-1]] }
    .set{ pipe_effects }

Channel
    .fromPath(params.school_info)
    .splitJson()
    .set{ pipe_school_info }
/*
========================================================================================
    Input data is received through channels
========================================================================================
*/

//import modules

def ZipChannel_dat = Channel.fromPath(params.composition_data) // change this to composition_sub whenever data file name changes


/*
========================================================================================
   Main Workflow
========================================================================================
*/

workflow {

    composition = GENERATE_READS(ZipChannel_dat)
    | flatten \
    | map { file ->
    def key = file.name.toString().split('\\.')[0]
    def school_ID = file.name.toString().split("_|\\.")[0]
    return tuple(school_ID, key, file)}


    pipe_meta.view()
    // pipe_school_info.view()
    // pipe_effects.view()
    // pipe_subgroup.view()


    // composition.view()

}

/*
========================================================================================
    A Nextflow process block. Process names are written, by convention, in uppercase.
    This convention is used to enhance workflow readability.
========================================================================================
*/

process GENERATE_READS{

  input:
          path targz

  publishDir "$projectDir/tmp", mode: "copy", overwrite: true

  output:
          path "*"

  script:
          """
          tar -xzf $targz
          # Print file name
          printf '${targz}\\t'
          """
}
Run the code using the following command on the terminal:
The fromFilePairs Channel factory
We have seen how to process files individually using
fromPath.
Another alternative is to use fromFilePairs to return a
grouping of data, represented as a list in the groovy syntax.
- The first element of the tuple emitted is a string based on the
shared part of the filenames (i.e., the
*part of the glob pattern). - The second element is the list of files matching the remaining part
of the glob pattern (i.e., the
*each_period.tar.gzpattern). This will include any sets of data that involve compressed folders.
What if you want to capture more than a pair?
If you want to capture more than two files for a pattern you will
need to change the default size argument (the default value
is 2) to the number of expected matching files.
The code above will create a queue channel containing one element.
See more information about the channel factory
fromFilePairs here
Task 4.4
Use the fromFilePairs method to create a channel
containing four tuples. Each tuple will contain the pairs of data reads
for the four schools with synthetic data in the tmp/
directory. Make sure you have previously completed Task 3.3, or check
your tmp/ folder contains both data files,
.RDS, as well as auxiliary data files,
.dat.
OUTPUT
[school123_period2, [/workspaces/training/sgsss-workflow/scripts/tmp/school123_period2.RDS, /workspaces/training/sgsss-workflow/scripts/tmp/school123_period2.dat]]
[school124_period2, [/workspaces/training/sgsss-workflow/scripts/tmp/school124_period2.RDS, /workspaces/training/sgsss-workflow/scripts/tmp/school124_period2.dat]]
[school126_period1, [/workspaces/training/sgsss-workflow/scripts/tmp/school126_period1.RDS, /workspaces/training/sgsss-workflow/scripts/tmp/school126_period1.dat]]
[school124_period1, [/workspaces/training/sgsss-workflow/scripts/tmp/school124_period1.RDS, /workspaces/training/sgsss-workflow/scripts/tmp/school124_period1.dat]]
[school125_period1, [/workspaces/training/sgsss-workflow/scripts/tmp/school125_period1.RDS, /workspaces/training/sgsss-workflow/scripts/tmp/school125_period1.dat]]
[school123_period1, [/workspaces/training/sgsss-workflow/scripts/tmp/school123_period1.RDS, /workspaces/training/sgsss-workflow/scripts/tmp/school123_period1.dat]]
[school126_period2, [/workspaces/training/sgsss-workflow/scripts/tmp/school126_period2.RDS, /workspaces/training/sgsss-workflow/scripts/tmp/school126_period2.dat]]
[school125_period2, [/workspaces/training/sgsss-workflow/scripts/tmp/school125_period2.RDS, /workspaces/training/sgsss-workflow/scripts/tmp/school125_period2.dat]]
- Channels must be used to import data into Nextflow.
- Nextflow has two different kinds of channels: queue channels and value channels.
- Data in value channels can be used multiple times in workflow.
- Data in queue channels are consumed when they are used by a process or an operator.
- Channel factory methods, such as
Channel.of, are used to create channels. - Channel factory methods have optional parameters e.g.,
checkIfExists, that can be used to alter the creation and behaviour of a channel.
Content from Modules
Last updated on 2025-07-05 | Edit this page
Overview
Questions
- How do I run tasks/modulees in Nextflow?
- How do I get data, files and values, into a module?
Objectives
- Understand how Nextflow uses modulees to implement tasks.
- Create a Nextflow module.
- Define inputs to a module.
Modules
We now know how to create and use Channels to send data around a workflow. We will now see how to run tasks within a workflow using modulees. Modules are nextflow scripts that can include definitions (workflows, processes, and functions).
A module is the way Nextflow implements commands you
would run on the command line or custom scripts.
Here we focus on how defining processes within a module. A process can be thought of as a particular step in a workflow, e.g. data wrangling for analysis. Modules are independent of each other (don’t require any another module to implement) and can not communicate/write to each other. Data is passed between modulees via input and output Channels.
For example, we previously saw the process
GENERATE_READS can accept multiple files as inputs. In the
previous episodes we saw examples of combinations of inputs,
each_period.tar.gz and
comopsition_each_period.tar.gz. Specifically in Task 4.3 we
used the channel.fromFilePairs() to generate tuples of
inputs with file names, including both data and auxiliary data
files.
Now we will show how to convert this into a simple Nextflow module.
Process definition
The module definition starts with keyword module,
followed by module name, in this case GENERATE_READS, and
finally the module body delimited by curly brackets
{}. The module body must contain a string which represents
the command or, more generally, a script that is implemented by it.
Implicit variables
We use the Nextflow implicit variable ${projectDir} to
specify the directory where the main script is located. This is
important as Nextflow scripts are implemented in a separate working
directory. A full list of implicit variables can be found here.
To add the module to a workflow, add a workflow block,
and call the module like a function. We will learn more about the
workflow block in the workflow episode. We can now run the
module:
Note We need to add the Nextflow run option
--module.debug to print the output to the terminal.
Task 5.1
Open the Nextflow script 05_modules.nf navigate to the
module definition section. You notice there is now a reference to a
module GENERATE_READS. Where is the process defined? How
many times is the process used in the workflow?
Essentially this stores the process definition for
GENERATE_READS. Note previously we defined the process in
the same file as our workflow, without having to fall back on a module.
It is generally good practice to organise code into modules, and store
these in the same folder. This is really helpful whenever we re-use a
process for a different purpose. Generally we can only use a process
once, if we need to repurpose a process, we’ll need to make sure to
assign an alias to each instance we refer to this. This is where modules
come handy as we can separate each set of code.
GROOVY
//import modules
include { GENERATE_READS as GENERATE_RDS} from './modules/generate_reads/'
include { GENERATE_READS as GENERATE_DAT} from './modules/generate_reads/'


def ZipChannel_dat = Channel.fromPath(params.composition_data) // change this to composition_sub whenever data file name changes
def ZipChannel_RDS = Channel.fromPath(params.school_data) // change this multi_period_sub whenever data file name changes

workflow {

    dataset =  GENERATE_DAT(ZipChannel_RDS) \
    | flatten \
    | map { file ->
    def key = file.name.toString().split('\\.')[0]
    def school_ID = file.name.toString().split("_|\\.")[0]
    return tuple(school_ID, key, file)}

    composition = GENERATE_RDS(ZipChannel_dat)
    | flatten \
    | map { file ->
    def key = file.name.toString().split('\\.')[0]
    def school_ID = file.name.toString().split("_|\\.")[0]
    return tuple(school_ID, key, file)}
}
Definition blocks
The previous example was a simple module with no defined
inputs and outputs that ran only once. To control inputs, outputs and
how a command is implemented a module may contain five definition
blocks:
- directives - 0, 1, or more: allow the definition of optional settings that affect the execution of the current module e.g. the number of cpus a task uses and the amount of memory allocated.
- inputs - 0, 1, or more: Define the input dependencies, usually channels, which determines the number of times a module is implemented.
- outputs - 0, 1, or more: Defines the output channels used by the module to send results/data produced by the module.
- when clause - optional: Allows you to define a condition that must be verified in order to implement the module.
- script block - required: A statement within quotes that defines the commands that are implemented by the module to carry out its task.
The syntax is defined as follows:
Script
At minimum a module block must contain a script
block.
The script block is a String “statement” that defines
the command that is implemented by the module to carry out its task.
These are normally the commands you would run on a terminal.
A module contains only one script block, and it must be
the last statement when the module contains input and
output declarations.
The script block can be a simple one line string in
quotes.
Or, for commands that span multiple lines you can encase the command
in triple quotes """.
By default the module command is interpreted as a Bash script. However, any other scripting language can be used just simply starting the script with the corresponding Shebang declaration.
This allows the use of a different programming languages which may better fit a particular job. However, for large chunks of code it is suggested to save them into separate files and invoke them from the module script.
Associated scripts
Scripts such as the one in the example above,
siena07RunSimOnly.R, can be stored in a bin
folder at the same directory level as the Nextflow workflow script that
invokes them, and permission to run files. Nextflow will automatically
add this folder to the PATH environment variable. To invoke
the script in a Nextflow module, simply use its filename on its own
rather than invoking the interpreter
e.g. siena07RunSimOnly.R instead of
R siena07RunSimOnly.R. Note The script
siena07RunSimOnly.R must be executable to run.
Script parameters
The command in the script block can be defined
dynamically using Nextflow variables e.g. ${projectDir}. To
reference a variable in the script block you can use the $
in front of the Nextflow variable name, and additionally you can add
{} around the variable name
e.g. ${projectDir}.
Variable substitutions
Similar to bash scripting Nextflow uses the $ character
to introduce variable substitutions. The variable name to be expanded
may be enclosed in braces {variable_name}, which are
optional but serve to protect the variable to be expanded from
characters immediately following it which could be interpreted as part
of the name. It is a good rule of thumb to always use the
{} syntax because it enhances readability and clarity,
ensures correct variable interpretation, and prevents potential syntax
errors in complex expressions. Note the $ symbol is
reserved for Nextflow variables, if you use this in e.g your R script
code, you will either need to escape the reserved character with
\$ or preferably use different syntax to index a
variable.
We saw in section 02 most cases we do not want to hard code parameter
values. We saw in the parameter episode the use of a special Nextflow
variable params that can be used to assign values from the
command line. You would do this by adding a key name to the params
variable and specifying a value, like
params.keyname = value
Note: parameters to the workflow can be specified
through the command line with two hyphens --.
OUTPUT
executor >  local (2)
[1b/fac7c3] process > GENERATE_DAT (1) [100%] 1 of 1 ✔
[cc/96a9e1] process > GENERATE_RDS (1) [100%] 1 of 1 ✔
[school123, 56]
[school124, 88]
[school125, 55]
[school126, 55]
Pipeline completed!
Started at  2025-06-26T12:42:32.047860197Z
Finished at 2025-06-26T12:42:35.178956448Z
Time elapsed: 3.1s
Execution status: OK
Inputs
Modules are isolated from each other but can communicate by sending
values and files via Nextflow channels from input and into
output blocks.
The input block defines which channels the module is
expecting to receive input from. The number of elements in input
channels determines the module dependencies and the number of times a
module is run.
You can only define one input block at a time and it must contain one or more input declarations.
The input block follows the syntax shown below:
The input qualifier declares the type of data to be received.
Input qualifiers
-
val: Lets you access the received input value by its name as a variable in the module script. -
env: Lets you use the input value to set an environment variable named as the specified input name. -
path: Lets you handle the received value as a file, staging the file properly in the execution context. -
stdin: Lets you forward the received value to the module stdin special file. -
tuple: Lets you handle a group of input values having one of the above qualifiers. -
each: Lets you implement the module for each entry in the input collection. A complete list of inputs can be found here.
Input values
The val qualifier allows you to receive value data as
input. It can be accessed in the module script by using the specified
input name, as shown in the following example:
In the above example the module is implemented 1 time; each time a
value is received from the queue channel composition it is
used to run the module.
Channel order
The channel guarantees that items are delivered in the same order as they have been sent, but since the module is implemented in a parallel manner, there is no guarantee on the order.
Input files
When you need to handle files as input, you need the
path qualifier. Using the path qualifier means
that Nextflow will stage it in the module directory, and it can be
accessed in the script by using the name specified in the input
declaration.
The input file name can be defined dynamically by defining the input
name as a Nextflow variable and referenced in the script using the
$variable_name syntax.
For example, in the script below, we assign the variable name
read to the input files using the path
qualifier.
In this way we can use a shell block definition instead
of script, for a trivial process such as extracting files
from a folder. When using the shell statement Bash
variables are referenced in the normal way
$my_bash_variable. However, the shell
statement uses a different syntax for Nextflow variable substitutions:
!{nextflow_variable}, which is needed to use both Nextflow
and Bash variables in the same script.
In the GENERATE_READS module definition file we set a
bash variable $targz. The variable was used to reference
the input file path. Previously, in episode 3, we also printed the file
path using printf '${targz}\\t' in our script block.
Recall the example in the script 03_params.nf
demonstrated use of a Bash variable, ${targz}.
The input name can also be defined as a user-specified filename
inside quotes. For example, in the script below, the name of the file is
specified as 'each_period.tar.gz' in the input definition
and can be referenced by that name in the script block.
File Objects as inputs
When a module declares an input file, the corresponding channel
elements must be file objects, i.e. created with the path helper
function from the file specific channel factories,
e.g. Channel.fromPath or
Channel.fromFilePairs. We saw examples for this in a
previous episode.
Task 5.3
For the script 05_modules.nf:
- Identify the names of the Channels using
fromPathfor theparams.school_dataandparams.composition_data. By definition are these queue or value channels? - Explain the role of the map closure
{}, how many outputs do the channelscompositionanddatasetreturn ?
- The names for the two queue channels are
ZipChannel_datandZipChannel_RDSand are defined with the following code:
GROOVY
//05_modules.nf

def ZipChannel_dat = Channel.fromPath(params.composition_data)
def ZipChannel_RDS = Channel.fromPath(params.school_data)- The map closure is a type of function operating on the output of a
Channel. Just like a function you return select values using the return
statement at the end of the function. In this case we return a tuple
with three self-explanatory items, the first two involve values and the
third is a file path,
tuple(school_ID, key, file). A close alternative is theChannel.fromFilePairs()which is a good option for combining two separate data types.
Combining input channels
A key feature of modulees is the ability to handle inputs from multiple channels. However, it’s important to understand how the number of items within the multiple channels affect the execution of a module.
Task 5.4
How is the output from either channel wrangled in the queue channel? Could you think of an alternative channel definition that could replicate the combination of a pair of channels?
The channel operator combine is used to combine the
main process output dataset and the process output
composition. We combine, or merge the two based on the
second item in the tuple, i.e key. It is important to note
that the counter for indexing tuples or lists in Nextflow starts from 0
rather than 1.
What is happening is that the module waits until it receives an input value from all the queue channels declared as input.
When this condition is verified, it uses up the input values coming from the respective queue channels, runs the task. This logic repeats until one or more queue channels have no more content. The module then stops.
What happens when not all channels have the same number of elements?
In the above example the module is implemented only two times, because when a queue channel has no more data, it stops the module execution.
Value channels and module termination
Note however that value channels,
Channel.value, do not affect the module termination.
To better understand this behaviour, compare the previous example with the following one:
Task 5.5
Open the nextflow script 05_modules.nf that combines two
input channels.
Identify the map_join closure and inspect the output of this returns whenever it operates on the combined output of the dataset and auxiliary data channels.
Input repeaters
We saw previously that by default the number of times a module runs
is defined by the queue channel with the fewest items. However, the
each qualifier allows you to repeat a module for each item
in a list or a queue channel, every time new data is received. The
material here simply motivates there is a sufficient number of options
to wrangle the inputs and outputs of a process to suit objectives.
Explore more information in the Nextflow
documentation.
- A Nextflow module is an independent step in a workflow.
- Modules contain up to five definition blocks including: directives, inputs, outputs, when clause and finally a script block.
- The script block contains the commands you would like to run.
- A module should have a script but the other four blocks are optional.
- Inputs are defined in the input block with a type qualifier and a name.
Content from Modules Part 2
Last updated on 2025-07-05 | Edit this page
Overview
Questions
- How do I get data, files, and values, out of processes?
- How do I handle grouped input and output?
- How can I control when a process is implemented?
- How do I control resources, such as number of CPUs and memory, available to processes?
- How do I save output/results from a process?
Objectives
- Define outputs to a process.
- Understand how to handle grouped input and output using the tuple qualifier.
- Understand how to use conditionals to control process execution.
- Use process directives to control execution of a process.
- Use the
publishDirdirective to save result files to a directory.
Outputs
We have seen how to input data into a process; now we will see how to output files and values from a process.
The output declaration block allows us to define the
channels used by the process to send out the files and values
produced.
An output block is not required, but if it is present it can contain one or more output declarations.
The output block follows the syntax shown below:
Output values
Like the input, the type of output data is defined using type qualifiers.
The val qualifier allows us to output a value defined in
the script.
Because Nextflow processes can only communicate through channels, if we want to share a value output of one process as input to another process, we would need to define that value in the output declaration block.
Output files
If we want to capture a file instead of a value as output we can use
the path qualifier that can capture one or more files
produced by the process, over the specified channel.
In the file 06_modules_optional.nf the process
ESTIMATION creates a file named
<chr>_SIM.RDS in the work directory containing the
output from simulation run after n iterations, required for this to
converge.
Since a file parameter using the same name,
<chr>_SIM.RDS, is declared in the output block, when
the task is completed that file is sent over the output channel.
A downstream operator, such as .view or a
process declaring the same channel as input will be able to
receive it.
Multiple output files
When an output file name contains a * or ?
metacharacter it is interpreted as a pattern match. This allows us to
capture multiple files into a list and output them as a one item
channel.
Note: There are some caveats on glob pattern behaviour:
- Input files are not included in the list of possible matches.
- Glob pattern matches against both files and directories path.
- When a two stars pattern
**is used to recurse through subdirectories, only file paths are matched i.e. directories are not included in the result list.
Grouped inputs and outputs
So far we have seen how to declare multiple input and output
channels, but each channel was handling only one value at time. However
Nextflow can handle groups of values using the tuple
qualifiers.
In tuples the first item is the grouping key and the second item is the list.
When using channel containing a tuple, such one created with
.filesFromPairs factory method.
In the same manner an output channel containing tuple of values can
be declared using the tuple qualifier following by the
definition of each tuple element in the tuple.
Conditional script execution
Sometimes you want to change how a module is run depending on some
condition. In Nextflow scripts we can use conditional statements such as
the if statement or any other expression evaluating to
boolean value true or false.
If statement
The if statement uses the same syntax common to other
programming languages such Java, C, JavaScript, etc.
GROOVY
if( < boolean expression > ) {
    // true branch
}
else if ( < boolean expression > ) {
    // true branch
}
else {
    // false branch
}
For example, the Nextflow script below will use the if
and else if pattern of statements to change what the
ESTIMATION module counts depending on an input.
Task 6.1
Inspect the module ESTIMATION, what is the name of the
input variable that is used by the workflow to evaluate a series of
conditional statements?
The input variable name is specification this takes on
character values so we need to use the == statement.
GROOVY
process ESTIMATION {
.
.
.
 input:
  tuple val(school_period), val(specification), val(school_ID_dat), path(compositionFile_period), val(school_ID), path(STR), val(period), val(effects)

  output:
.
.
.

script:

  if (specification == "all")
      template '1000_model_estimation_all.R'
  else if (specification == "influence")
      template '1000_model_estimation_influence.R'
  else if (specification == "none")
      template '1000_model_estimation_no.R'
  else
      template '1000_model_estimation_selection.R'

}
Conditional execution of a process
The when declaration allows you to define a condition
that must be verified in order to execute the process. This can be any
expression that evaluates a boolean value; true or
false.
It is useful to enable/disable the process execution depending on the state of various inputs and parameters.
Directives
Directive declarations allow the definition of optional settings,
like the number of cpus and amount of memory,
that affect the execution of the current process without affecting the
task itself.
They must be entered at the top of the process body, before any other
declaration blocks (i.e. input, output,
etc).
Note: You do not use = when assigning a
value to a directive.
Directives are commonly used to define the amount of computing resources to be used or extra information for configuration or logging purpose.
Task 6.2
Inspect the module ESTIMATION, what is the name of the
variable used in the directive or tag of the process? Where is this
defined in the process?
The above process uses the one directives, tag.
The tag directive to allow you to give a custom tag to
each process execution. This tag makes it easier to identify a
particular task (implemented instance of a process) in a log file or in
the execution report.
Another directive cpus allows you to define the number
of CPUs required for each task.
One other directive echo true prints the stdout to the
terminal.
We use the Nextflow task.cpus variable to capture the
number of cpus assigned to a task. This is frequently used to specify
the number of threads in a multi-threaded command in the script
block.
Another commonly used directive is memory specification:
memory.
A complete list of directives is available at this link.
Task 6.3
Many software tools allow users to configure the number of CPU threads used, optimizing performance for faster and more efficient data processing in high-throughput tasks.
Open the 06_modules_optional.nf script.
Based on the set of directives write a comment explaining what the purpose of each one is.
GROOVY
//06_modules_optional.nf

process ESTIMATION {

  tag{school_period}

  label 'small_time_cpus' // process label allocating resources

  errorStrategy { task.exitStatus == 140 ? 'retry' : 'ignore' } // if a task happens to fail, ask nextflow to carry on with the rest of the tasks, otherwise it'll stop all processes
  maxRetries 1 // specify the number of times to a process is to be rescheduled once it fails
.
.
.

}
Organising outputs
PublishDir directive
Nextflow manages intermediate results from the pipeline’s expected outputs independently.
Files created by a process are stored in a task specific
working directory which is considered as temporary. Normally this is
under the work directory, which can be deleted upon
completion.
The files you want the workflow to return as results need to be
defined in the output block of the process and then the
output directory specified using the directive
publishDir. More information here.
Note: A common mistake is to specify an output
directory in the publishDir directive while forgetting to
specify the files you want to include in the output
block.
For example if we want to capture the results of the
ESTIMATION process in a
results/siena_sim/$school_period output directory we need
to define the files in the output and specify the location
of the results directory in the publishDir directive:
In the above example, the
publishDir "results/siena_sim/$school_period", creates a
symbolic link -> to the output files specified by the
process ESTIMATION.simulation_ch to the directory path
results/siena_sim/$school_period.
A symbolic link, often referred to as a symlink, is a type of file that serves as a reference or pointer to another file or directory, allowing multiple access paths to the same resource without duplicating its actual data.
publishDir
The publishDir output is relative to the path the pipeline run has
been launched. Hence, it is a good practice to use implicit
variables like projectDir to specify publishDir
value.
publishDir parameters
The publishDir directive can take optional parameters,
for example the mode parameter can take the value
"copy" to specify that you wish to copy the file to output
directory rather than just a symbolic link to the files in the working
directory. Since the working directory is generally deleted on
completion of a pipeline, it is safest to use mode: "copy"
for results files. The default mode (symlink) is helpful for checking
intermediate files which are not needed in the long term.
Full list here.
Manage semantic sub-directories
You can use more than one publishDir to keep different
outputs in separate directories. To specify which files to put in which
output directory use the parameter pattern with the a glob
pattern that selects which files to publish from the overall set of
output files.
In the example below we will create an output folder structure in the
directory results, which contains a separate sub-directory for sequence
id file, pattern: "*.png" , and a sequence directory,
"$params.outdir/siena_gof/$school_period" for the set of
goodness of fit figures assessing model fit. Remember, we need to
specify the files we want to copy as outputs.
Task 6.4
Inspect the publishDir directive to the nextflow script
06_modules_optional.nf can you identify how many unique
output directories are specified by this single process ?
GROOVY
//06_modules_optional.nf

process ESTIMATION {

.
.
.

  publishDir "$params.outdir/siena_fit", pattern: "*.RDS",  mode: "copy", overwrite: true // all file outputs are copied to this directory - i.e CONVERGED / NOT CONVERGED

  publishDir "$params.outdir/siena_sim/$school_period", pattern: "*_SIM.RDS",  mode: "copy", overwrite: true
  publishDir "$params.outdir/siena_gof/$school_period", pattern: "*.png",  mode: "copy", overwrite: true

.
.
.

} Nextflow Patterns
If you want to find out common structures of Nextflow processes, the Nextflow Patterns page collects some recurrent implementation patterns used in Nextflow applications.
- Outputs to a process are defined using the output blocks.
- You can group input and output data from a process using the tuple qualifier.
- The execution of a process can be controlled using the
whendeclaration and conditional statements. - Files produced within a process and defined as
outputcan be saved to a directory using thepublishDirdirective.
Content from Workflow
Last updated on 2025-06-28 | Edit this page
Overview
Questions
- How do I connect channels and processes to create a workflow?
- How do I invoke a process inside a workflow?
Objectives
- Create a Nextflow workflow joining multiple processes.
- Understand how to to connect processes via their inputs and outputs within a workflow.
Workflow
Our previous episodes have shown how to parameterise workflows using
params, move data around a workflow using
channels and define individual tasks using
processes. In this episode we will cover how connect
multiple processes to create a workflow.
Workflow definition
We can connect processes to create our pipeline inside a
workflow scope. The workflow scope starts with the keyword
workflow, followed by an optional name and finally the
workflow body delimited by curly brackets {}.
Task 7.1
Ready set workflow! Run the full workflow demo.
OUTPUT
training/sgsss-workflow/scripts -> nextflow run main.nf -profile local
Nextflow 25.04.4 is available - Please consider updating your version to it

 N E X T F L O W   ~  version 25.04.3

Launching `main.nf` [confident_kimura] DSL2 - revision: bc82a00e22


====================================================
 ╔═╔ ╔═╗╔╗╔ ╔═╗
 ║ ║ ║╣ ║║║ ║═║
═╝ ╝ ╚═╝╝╚╝ ╝ ╝
====================================================
batches                     : 1
model specification         : /workspaces/training/sgsss-workflow/scripts/params/meta.csv
school data                 : /workspaces/training/sgsss-workflow/scripts/data/each_period.tar.gz
school info                 : /workspaces/training/sgsss-workflow/scripts/params/school_info.json
composition data            : /workspaces/training/sgsss-workflow/scripts/data/composition_each_period.tar.gz
effects                     : /workspaces/training/sgsss-workflow/scripts/params/effects.csv
subgroup                    : /workspaces/training/sgsss-workflow/scripts/params/subgroup.csv


executor >  local (8)
[d0/de71b6] GENERATE_DAT (1)               [100%] 1 of 1 ✔
[08/aff58c] GENERATE_RDS (1)               [100%] 1 of 1 ✔
[0e/2d5ac4] ESTIMATION (school123_period2) [ 12%] 4 of 32
[-        ] META_MORAN                     -
[-        ] JOINFILES                      -
Implicit workflow
In contrast to processes, the workflow definition in Nextflow does not require a name. In Nextflow, if you don’t give a name to a workflow, it’s considered the main/implicit starting point of your workflow program.
A named workflow is a subworkflow that can be invoked
from other workflows, subworkflows are not covered in this lesson, more
information can be found in the official documentation here.
Invoking processes with a workflow
As seen previously, a process is invoked as a function
in the workflow scope, passing the expected input channels
as arguments as it if were.
To combine multiple processes invoke them in the order they would
appear in a workflow. When invoking a process with multiple inputs,
provide them in the same order in which they are declared in the
input block of the process.
Process outputs
A process output can also be accessed directly using the
out attribute for the respective
process object. Remember this is what we did in the Hello
Nextflow episode when we specified
GENERATE_READS.out.view() in the workflow definition.
When a process defines two or more output channels, each of them can
be accessed using the list element operator e.g. out[0],
out[1], or using named outputs.
Process named output
It can be useful to name the output of a process, especially if there are multiple outputs.
The process output definition allows the use of the
emit: option to define a named identifier that can be used
to reference the channel in the external scope.
Task 7.2
Inspect the code for the ESTIMATION module. Can you
identify the named output that is used in the workflow in the
main.nf file?
Accessing script parameters
A workflow component can access any variable and parameter defined in the outer scope.
In this example pipe_meta or pipe_effects,
are defined outside the workflow scope, but are accessed inside the
workflow scope.
Task 7.3
Open the main.nf file and identify at which stage of the
workflow is the output of the process META_MORAN being
connected to JOINFILES process in the workflow
definition.
Note: You will need to use the collect
operator to gather the items in the simulation_ch to a single List item.
The reason for this is the JOINFILES module combines output
into a figure summarising model comparison statistics.
GROOVY
//main.nf

workflow {
.
.
.
    estimation_out.simulation_ch\
        | map { it -> [it[0].split('_|\\.')[0], it[1], it[2], it[3], it[4]]} \
        | combine(mapped_params, by: 0) \
        | transpose \
        | groupTuple(by: [1, 5], sort: true) \
        | map { it -> [it[1], it[3][0], it[3][1], it[3][2], it[3][3], it[5]]  } \
        | META_MORAN \
        | collect \
        | JOINFILES \
        | view
}
To import the workflow code navigate to the following repository:
Then download the code as a ZIP folder or preferably use the git command to store a local copy:
BASH
git clone --branch ready-set-workflow --single-branch https://github.com/omiridoue/sgsss-workflow.gitNote if you download the material as a ZIP folder this will rename the folder to sgsss-workflow-ready-set-workflow you can always reinstate the repository name to avoid running into any name clashes.
- A Nextflow workflow is defined by invoking
processesinside theworkflowscope. - A process is invoked like a function inside the
workflowscope passing any required input parameters as arguments. e.g.ESTIMATION(estimation_channel). - Process outputs can be accessed using the
outattribute for the respectiveprocessobject or assigning the output to a Nextflow variable. - Multiple outputs from a single process can be accessed using the
list syntax
[]and it’s index or by referencing the a named process output .
Content from Operators
Last updated on 2025-07-05 | Edit this page
Overview
Questions
- How do I perform operations, such as filtering, on channels?
- What are the different kinds of operations I can perform on channels?
- How do I combine operations?
- How can I use a CSV file to process data into a Channel?
Objectives
- Understand what Nextflow operators are.
- Modify the contents/elements of a channel using operators.
- Perform filtering and combining operations on a channel object.
- Use the
splitCsvoperator to parse the contents of CSV file into a channel .
Operators
In the Channels episode we learnt how to create Nextflow channels to
enable us to pass data and values around our workflow. If we want to
modify the contents or behaviour of a channel, Nextflow provides methods
called operators. We have previously used the
view operator to view the contents of a channel. There are
many more operator methods that can be applied to Nextflow channels that
can be usefully separated into several groups:
- Filtering operators: reduce the number of elements in a channel.
- Transforming operators: transform the value/data in a channel.
- Splitting operators: split items in a channel into smaller chunks.
- Combining operators: join channels together.
- Maths operators: apply simple math functions on channels.
- Other: such as the view operator.
In this episode you will see examples, and get to use different types of operators.
Using Operators
To use an operator, the syntax is the channel name, followed by a dot
. , followed by the operator name and brackets
().
view
The view operator prints the items emitted by a channel
to the console appending a new line character to each item in
the channel. We can also chain together the channel factory method
.of and the operator .view() using the dot
notation. Note: the view() operator
doesn’t change the contents of the channel object.
Task 8.1
To make code more readable we can split the operators over several lines. The blank space between the operators is ignored and is solely for readability.
Closures
An optional closure {} parameter can be
specified to customise how items are printed.
Briefly, a closure is a block of code that can be passed as an
argument to a function. In this way you can define a chunk of code and
then pass it around as if it were a string or an integer. By default the
parameters for a closure are specified with the groovy keyword
$it (‘it’ is for ‘item’).
Task 8.2
For example here we apply a closure to the queue channel, to separate the first two columns of the csv file as separate parameters and group all remaining columns into a single list of parameters.
Filtering operators
We can reduce the number of items in a channel by using filtering operators.
The filter operator allows you to get only the items
emitted by a channel that satisfy a condition and discard all the
others. The filtering condition can be specified by using either:
- a regular expression
- a literal value
- a data type qualifier, e.g. Number (any integer,float …), String, Boolean
- or any boolean statement.
Data type qualifier
Here we use the filter operator specifying the data type
qualifier Number so that only numeric items are returned.
The Number data type includes both integers and floating point numbers.
We will then use the view operator to print the contents.
To simplify the code we can chain multiple operators together, such as
filter and view using a . .
The previous example could be rewritten like: The blank space between the operators is ignored and is used for readability.
Regular expression
We chain the .split() function, to extract the school ID
from the input file name.
Task 8.3
Based on the example code in the 08_operators.nf file,
explain the purpose of the split operator and intended output. Use the
nextflow run 08_operators.nf to run the workflow and
inspect the processs output using the .view() operator.
Note we specify a regular expression .split("_|\\.")
within the function in order to split the string based on the underscore
“_” or punctuation “.” (whichever comes first) to derive an input
variable, based on school ID. This is where generating file names
dynamically as part of the workflow becomes relevant, as file names can
be play an important role in managing the stream of data.
Modifying the contents of a channel
If we want to modify the items in a channel, we can use transforming operators.
Applying a function to items in a channel
The map operator applies a function of your choosing to
every item in a channel, and returns the items so obtained as a new
channel. The function applied is called the mapping function and is
expressed with a closure {}.
We can also use the map operator to transform each
element into a tuple.
In the example below we use the map operator to
transform a channel.
We can change the default name of the closure parameter keyword from
it to a more meaningful name file using
->. When we have multiple parameters we can specify the
keywords at the start of the closure,
e.g. file, key ->.
Task 8.4
Inspect the code in the file 08_operators.nf explain the
purpose of the map operator on the
estimation_out.simulation_ch. How is it used to transform
the contents into a tuple with the file and the file’s name? Write
additional comments within the script. (Hint: Use the view
operator to inspect the channel contents.)
The simulation_ch output emits a tuple of elements as part of the
simulation output from the ESTIMATION process. The map
operator transforms the first of the elements indexed by
[0] and uses a regular expression to split the character
value on the first _ it encounters. Ex. it takes
school123_period1 and returns school123, this
allows us to generate a school identifier.
Converting a list into multiple items
The flatten operator transforms a channel in such a way
that every item in a list or tuple is
flattened so that each single entry is emitted as a sole element by the
resulting channel.
This is similar to the channel factory
Channel.fromList.
Converting the contents of a channel to a single list item.
The reverse of the flatten operator is
collect. The collect operator collects all the
items emitted by a channel to a list and return the resulting object as
a sole emission. This can be extremely useful when combining the results
from the output of multiple processes, or a single process run multiple
times.
The result of the collect operator is a value channel
and can be used multiple times.
Grouping contents of a channel by a key.
The groupTuple operator collects tuples or
lists of values by grouping together the channel elements
that share the same key. Finally it emits a new tuple object for each
distinct key collected.
If we know the number of items to be grouped we can use the
groupTuple and size parameter. When the
specified size is reached, the tuple is emitted. By default incomplete
tuples (i.e. with less than size grouped items) are discarded
(default).
This operator is useful to process altogether all elements for which there’s a common property or a grouping key.
Task 8.5
Inspect the code in the file 08_operators.nf explain the
purpose of the groupTuple operator. How is it used to
transform the contents into a tuple ? Write additional comments within
the script. (Hint: Use the view operator to inspect the
channel contents.)
Merging Channels
Combining operators allows you to merge channels together. This can be useful when you want to combine the output channels from multiple processes.
mix
The mix operator combines the items emitted by two (or
more) channels into a single channel.
The items emitted by the resulting mixed channel may appear in any order, regardless of which source channel they came from. Thus, the following example it could be a possible result of the above example as well.
Maths operators
The maths operators allows you to apply simple math function on channels.
The maths operators are:
- count
- min
- max
- sum
- toInteger
Splitting items in a channel
Sometimes you want to split the content of a individual item in a channel, like a file or string, into smaller chunks that can be processed by downstream operators or processes e.g. items stored in a CSV file.
Nextflow has a number of splitting operators that can achieve this:
- splitCsv: The splitCsv operator allows you to parse text items emitted by a channel, that are formatted using the CSV format, and split them into records or group them into list of records with a specified length.
- splitText: The splitText operator allows you to split multi-line strings or text file items, emitted by a source channel into chunks containing n lines, which will be emitted by the resulting channel.
splitCsv
The splitCsv operator allows you to parse text items
emitted by a channel, that are formatted using the CSV format, and split
them into records or group them into list of records with a specified
length. This is useful when you want to use a sample sheet.
In the simplest case just apply the splitCsv operator to
a channel emitting a CSV formatted text files or text entries. For
example:
For the CSV file effects.csv.
We can use the splitCsv() operator to split the channel
contaning a CSV file into three elements.
The above example shows hows the CSV file effects.csv is
parsed and is split into three elements.
Accessing values
Values can be accessed by their positional indexes using the square
brackets syntax[index]. So to access the first column you
would use [0] as shown in the following example:
Column headers
When the CSV begins with a header line defining the column names, you
can specify the parameter header: true which allows you to
reference each value by its name, as shown in the following example:
Task 8.6
Inspect the 08_operators.nf, how is the
params/effects.csv being parsed?
Each row of the csv is read as a separate input. The closure using the map operator organises inputs by indexing the column order. The first two columns are stored as separate elements while the remaining columns are grouped into a list. The resulting input comprises of a tuple that involves 3 elements, two values and one list.
More resources
See the operators documentation on the Nextflow web site.
- Nextflow operators are methods that allow you to modify, set or view channels.
- Operators can be separated in to several groups; filtering , transforming , splitting , combining , forking and Maths operators.
- To use an operator use the dot notation after the Channel object
e.g.
ESTIMATION.simulation_ch.view(). - You can parse text items emitted by a channel, that are formatted
using the CSV format, using the
splitCsvoperator.
Content from Reporting
Last updated on 2025-06-27 | Edit this page
Overview
Questions
- How do I get information about my pipeline run?
- How can I see what commands I ran?
- How can I create a report from my run?
Objectives
- View Nextflow pipeline run logs.
- Use
nextflow logto view more information about a specific run. - Create an HTML report from a pipeline run.
Nextflow log
Once a script has run, Nextflow stores a log of all the workflows executed in the current folder. Similar to an electronic lab book, this means you have a record of all processing steps and commands run.
You can print Nextflow’s execution history and log information using
the nextflow log command.
This will print a summary of the executions log and runtime information for all pipelines run. By default, included in the summary, are the date and time it ran, how long it ran for, the run name, run status, a revision ID, the session id and the command run on the command line.
The output will look similar to this:
OUTPUT
TIMESTAMP               DURATION        RUN NAME                STATUS  REVISION ID     SESSION ID                        COMMAND
2025-04-12 17:56:01     3.2s            disturbed_bartik        OK      8a3d1bb9c7      09de2950-9894-4463-b55b-4afa4268a3e2    nextflow run read_data.nf
If we want to get more information about a timeline we can request a
timeline or report to be outputted to the docs/ folder in
our repository.
Task 9.2
Output a report.
GROOVY
report {
  // there is some isse with ps not being available in the container So I wanted to ask if you see the possibility to include ps in your docker container so that it can be used with nextflow (had only a problem with missing ps, but all others seem available, i.e. awk, date, grep, egrep, sed, tail, tee).
  enabled = true
  overwrite = true
  file = "${projectDir}/docs/report.html"
}
This will list the set of tasks and the time and memory resources these required to be completed. Additionally, further information is included on the command used to launch the pipeline, the output directory, and the status of each job submission, i.e whether this was Cached (run previously), Succeeded or Failed.
Information is included on the timeline of tasks scheduled as part of the pipeline.
Task 9.3
Output a timeline.
- Nextflow can produce a custom execution report with run information
using the
logcommand. - You can generate a report or timeline using the template specified by Nextflow.
Content from Nextflow configuration
Last updated on 2025-06-27 | Edit this page
Overview
Questions
- How do I configure a Nextflow workflow?
- How do I assign different resources to different processes?
- How do I separate and provide configuration for different computational systems?
Objectives
- Create a Nextflow configuration file.
- Be able to assign resources to a process.
- Be able to inspect configuration settings before running a workflow.
Nextflow configuration
A key Nextflow feature is the ability to decouple the workflow implementation, which describes the flow of data and operations to perform on that data, from the configuration settings required by the underlying execution platform. This enables the workflow to be portable, allowing it to run on different computational platforms such as an institutional HPC or cloud infrastructure, without needing to modify the workflow implementation.
We have seen earlier that it is possible to provide a
process with directives. These directives are process
specific configuration settings. Similarly, we have also provided
parameters to our workflow which are parameter configuration settings.
These configuration settings can be separated from the workflow
implementation, into a configuration file.
Settings in a configuration file are sets of name-value pairs
(name = value). The name is a specific
property to set, while the value can be anything you can
assign to a variable (for ex. strings, booleans, or other variables). It
is also possible to access any variable defined in the host environment
such as $PATH, $HOME, $PWD,
etc.
Configuration file
Generally, variables and functions defined in a configuration file
are not accessible from the workflow script. Only variables defined
using the params scope and the env scope
(without env prefix) can be accessed from the workflow
script.
Settings are also partitioned into scopes, which govern the behaviour
of different elements of the workflow. For example, workflow parameters
are governed from the params scope, while process
directives are governed from the process scope. A full list
of the available scopes can be found in the documentation.
It is also possible to define your own scope.
Task 10.1
Configuration settings for a workflow are often stored in the file
nextflow.config which is in the same directory as the
workflow script. Configuration can be written in either of two ways. The
first is using dot notation, and the second is using brace notation.
Both forms of notation can be used in the same configuration file.
An example of dot notation:
GROOVY
params.outdir = "${baseDir}/results"   // The workflow parameter "outdir" is assigned the value base output directory and './results' subfolder to use by default.
params.meta = "${baseDir}/params/meta.csv"
params.effects = "${baseDir}/params/effects.csv"
params.subgroup = "${baseDir}/params/subgroup.csv"
params.school_data = "${baseDir}/data/each_period.tar.gz"
params.school_info = "${baseDir}/params/school_info.json"
params.composition_data = "${baseDir}/data/composition_each_period.tar.gz"
An example of brace notation:
GROOVY
params {
                outdir = "${baseDir}/results"
                batches = 1
                meta = "${baseDir}/params/meta.csv"
                effects = "${baseDir}/params/effects.csv"
                subgroup = "${baseDir}/params/subgroup.csv"
                school_data = "${baseDir}/data/each_period.tar.gz"
                school_info = "${baseDir}/params/school_info.json"
                composition_data = "${baseDir}/data/composition_each_period.tar.gz"
}
Configuration files can also be separated into multiple files and
included into another using the
includeConfig "params.config" statement.
How configuration files are combined
Configuration settings can be spread across several files. This also allows settings to be overridden by other configuration files. The priority of a setting is determined by the following order, ranked from highest to lowest.
- Parameters specified on the command line
(
--param_name value). - Parameters provided using the
-params-fileoption. - Config file specified using the
-cmy_config option. - The config file named
nextflow.configin the current directory. - The config file named
nextflow.configin the workflow project directory ($projectDir: the directory where the script to be run is located). - The config file
$HOME/.nextflow/config. - Values defined within the workflow script itself (e.g.,
main.nf).
If configuration is provided by more than one of these methods, configuration is merged giving higher priority to configuration provided higher in the list.
Configuring Nextflow vs Configuring a Nextflow workflow
The majority of Nextflow configuration settings must be provided on
the command-line, however a handful of settings can also be provided
within a configuration file, such as
workdir = '/path/to/work/dir'
(-w /path/to/work/dir) or resume = true
(-resume), and do not belong to a configuration scope.
Configuring process behaviour
Earlier we saw that process directives allow the
specification of settings for the task execution such as
cpus, memory, conda and other
resources in the pipeline script. This is useful when prototyping a
small workflow script, however this ties the configuration to the
workflow, making it less portable. A good practice is to separate the
process configuration settings into another file.
The process configuration scope allows the setting of
any process directives in the conf/ directory.
Task 10.2
Navigate to the conf folder and open the local.config
file. What qualifier is being used to allocate resources to the process,
and how many resources does this involve?
Unit values
Memory and time duration units can be specified either using a string based notation in which the digit(s) and the unit can be separated by a space character, or by using the numeric notation in which the digit(s) and the unit are separated by a dot character and not enclosed by quote characters.
| String syntax | Numeric syntax | Value |
|---|---|---|
| ‘10 KB’ | 10.KB | 10240 bytes |
| ‘500 MB’ | 500.MB | 524288000 bytes |
| ‘1 min’ | 1.min | 60 seconds |
| ‘1 hour 25 sec’ | - | 1 hour and 25 seconds |
These settings are applied to all processes in the workflow. A process selector can be used to apply the configuration to a specific process or group of processes.
Process selectors
When a workflow has many processes, it is inconvenient to specify
directives for all processes individually, especially if directives are
repeated for groups of processes. A helpful strategy is to annotate the
processes using the label directive (processes can have
multiple labels). The withLabel selector then allows the
configuration of all processes annotated with a specific label, as shown
below:
Another strategy is to use process selector expressions. Both
withName: and withLabel: allow the use of
regular expressions to apply the same configuration to all processes
matching a pattern. Regular expressions must be quoted, unlike simple
process names or labels.
- The
|matches either-or, e.g.,withName: 'small_time_cpus|big_mem'applies the configuration to any process matching the namesmall_time_cpusorbig_mem. - The
!inverts a selector, e.g.,withLabel: '!big_mem'applies the configuration to any process without thebig_memlabel. - The
.*matches any number of characters, e.g.,withName: 'small_time_cpus:big_mem:.*'matches all processes of the workflowsmall_time_cpus:big_mem.
A regular expression cheat-sheet can be found here if you would like to write more expressive expressions.
Selector priority
When mixing generic process configuration and selectors, the following priority rules are applied (from highest to lowest):
-
withNameselector definition. -
withLabelselector definition. - Process specific directive defined in the workflow script.
- Process generic
processconfiguration.
Dynamic expressions
A common scenario is that configuration settings may depend on the data being processed. Such settings can be dynamically expressed using a closure.
Task 10.3
For example, we can specify the memory required as a
multiple of the number of cpus. Similarly, we can publish
results to a subfolder based on the sample name.
GROOVY
process ESTIMATION {

  tag{school_period}
  label 'small_time_cpus'

  errorStrategy { task.exitStatus == 140 ? 'retry' : 'ignore' }
  maxRetries 1

  .
  .
  .
}

process {
    .
    .
    .
    withLabel: small_time_cpus {
    executor = 'slurm'
    time   = { 2.h   * task.attempt }
    clusterOptions = "--account=none --mem=20G --partition=nodes --nodes=1 --cpus-per-task=10"
  }
    .
    .
    .
}
Configuring execution platforms
Nextflow supports a wide range of execution platforms, from running locally, to running on HPC clusters or cloud infrastructures. See https://www.nextflow.io/docs/latest/executor.html for the full list of supported executors.
Task 10.4
The process.executor directive allows you to override
the executor to be used by a specific process. This can be useful, for
example, when there are short running tasks that can be run locally, and
are unsuitable for submission to HPC executors (check for guidelines on
best practice use of your execution system). Other process directives
such as process.clusterOptions, process.queue,
and process.machineType can be also be used to further
configure processes depending on the executor used.
GROOVY
//conf/slurm.config
process {
    withLabel: big_mem {
    executor = 'slurm'
    clusterOptions = "--account=none --time=15:00 --mem=7G --partition=nodes --nodes=1 --ntasks-per-node=1 --cpus-per-task=1 "
  }
    withLabel: small_time_cpus {
    executor = 'slurm'
    time   = { 2.h   * task.attempt }
    clusterOptions = "--account=none --mem=20G --partition=nodes --nodes=1 --cpus-per-task=10"
  }
    withLabel: big_time_cpus {
    executor = 'slurm'
    clusterOptions = "--account=none --time=10:00 --mem=1G --partition=nodes --nodes=1 --cpus-per-task=10"
  }
}
Configuring software requirements
Docker is a container technology. Container images are lightweight, standalone, executable package of software that includes everything needed to run an application: code, runtime, system tools, system libraries and settings. Containerized software is intended to run the same regardless of the underlying infrastructure, unlike other package management technologies which are operating system dependant (See the published article on Nextflow). For each container image used, Nextflow uses Docker to spawn an independent and isolated container instance for each process task.
To use Docker, we must provide a container image path using the
process.container directive, and also enable docker in the
docker scope, docker.enabled = true. A container image path
takes the form
(protocol://)registry/repository/image:version--build. By
default, Docker containers run software using a privileged user. This is
where Apptainer is preferred for computer cluster.
Software configuration using Apptainer (former Singularity)
Singularity is another container technology, commonly used on HPC
clusters. It is different to Docker in several ways. The primary
differences are that processes are run as the user, and certain
directories are automatically “mounted” (made available) in the
container instance. Singularity also supports building Singularity
images from Docker images, allowing Docker image paths to be used as
values for process.container.
Singularity is enabled in a similar manner to Docker. A container
image path must be provided using process.container and
singularity enabled using apptainer.enabled = true.
See episode 12 for more information on Auxiliary tools.
Container protocols
The following protocols are supported:
-
docker://: download the container image from the Docker Hub and convert it to the Singularity format (default). -
library://: download the container image from the Singularity Library service. -
shub://: download the container image from the Singularity Hub. -
https://: download the singularity image from the given URL. -
file://: use a singularity image on local computer storage.
Configuration profiles
One of the most powerful features of Nextflow configuration is to
predefine multiple configurations or profiles for different
execution platforms. This allows a group of predefined settings to be
called with a short invocation,
-profile <profile name>.
Task 10.5
Configuration profiles are defined in the profiles
scope, which group the attributes that belong to the same profile using
a common prefix.
GROOVY
//nextflow.config

profiles {
  local {
    includeConfig 'conf/local.config'
    docker.enabled = true
    process.container = 'omiridoue/siena_r:0.8'
  }
  slurm {
    includeConfig 'conf/slurm.config'
    apptainer.enabled = true

    apptainer.cacheDir = "apptainer"
    apptainer.autoMounts = true

    process.executor = 'slurm'
    process.container = 'omiridoue/siena_r:0.8'
  }
}
This configuration defines three different profiles:
local, and slurm that set different process
configuration strategies depending on the target execution platform. By
convention the standard profile is implicitly used when no other profile
is specified by the user. To enable a specific profile use
-profile option followed by the profile name:
- Nextflow configuration can be managed using a Nextflow configuration file.
- Nextflow configuration files are plain text files containing a set of properties.
- You can define process specific settings, such as cpus and memory,
within the
processscope. - You can assign different resources to different processes using the
process selectors
withNameorwithLabel. - You can define a profile for different configurations using the
profilesscope. These profiles can be selected when launching a pipeline execution by using the-profilecommand-line option - Nextflow configuration settings are evaluated in the order they are read-in.
Content from Auxiliary Tools
Last updated on 2025-06-28 | Edit this page
Overview
Questions
- When should I use a pre-built container?
- How can I customise a container?
- What is a remote codespace?
Objectives
- Understand how to reproduce code.
- Understand the benefits of containers.
Docker Hub
By sharing a container, you create a portable and replicable research environment that can be easily accessed and used by other researchers. This process not only facilitates collaboration but also ensures that your work is preserved in an environment where it can be run without compatibility issues, i.e you can do your best to ‘future-proof’ your research.
To share your code and software, you’ll use Docker Hub. Docker hub is a cloud-based registry service that lets you share and distribute container images.
There is a sea of containers out there, it is not necessarily safe to use a docker container, as there is always risk of malware. The following involves guidance on best practice:
- The container image is updated regularly, the latest version should be available alongside previous versions.
- There is a Dockerfile or other listing of what has been installed to the container image.
- The container image page has documentation on how to use the container image.
If a container image is never updated, and does not have a lot of metadata, it is probably worth skipping over. Even if such a container image is secure, it is not reproducible and not a dependable way to run research computations.
Docker Recipe File
Much like a cookbook, you can pull out recipes and alter to own preference. This is how you normally get started building your own image, you can start with a base repository.
Task 11.1
In this case we use a base image for R on a Linux machine, from bioconductor. We layer requirements, i.e code libraries.
To do this we evaluate the command install.packages()
using R. This is possible as we work within the docker container which
has already installed R. We install packages directly from CRAN, in this
case the recipe file could be improved on by requesting exact versions
for packages.
We also demonstrate installing RSiena version 1.4.19
from source code. Note as we build the container, we realise this is a
self-contained enviroment and so need to manage file paths the same way
we would with a folder that takes up its own space on our directory. To
do this we copy the source code into the top level of our container and
then use option
install.packages(...,repos = NULL, type= 'source'). The
next steps involve pushing the local container onto docker hub, under
the name, siena_r and a version tag number. As this is an
iterative process, the version tag number we are working with here
follows the semi-colon siena_r:0.8. In some cases you may
require a specific version of a container; however, the most recent
version can also be requested with siena_r:latest.
FROM bioconductor/bioconductor_docker:devel-R-4.4.1

RUN R -e "install.packages(c('Matrix', 'lattice', 'parallel', 'MASS', 'methods', 'xtable', 'network', 'vioplot', 'sna', 'codetools', 'dplyr', 'metafor', 'argparse', 'stringr', 'mixmeta'), repos = c(CRAN = 'https://cloud.r-project.org'))"

COPY rsiena_1.4.19.tar.gz .

RUN R -e "install.packages('rsiena_1.4.19.tar.gz', repos = NULL, type = 'source')"
Git
Task 11.2

Containers in the workflow
Within our workflow we can specify the container we want to use, as a matter of fact we can specify a container for different processes - the possibility is endless! Say for example you would like to write interoperable code and use Python for one part of your analysis and R for another part, this is possible by defining a different container for each process. Another option is to build one container with all the software (i.e R and Python) installed.
Say we work with one container, but would like to make sure the pipeline is portable. In this case we work with profiles, which is another layer for customisation.
Alternative Platforms for compute clusters
Many container platforms are available, but Apptainer is designed for ease-of-use on shared systems and in high performance computing (HPC) environments. Nextflow can build an immutable image based off a Docker recipe file.
Building an Apptainer Image
Workflow Definition
Within our workflow, we can declare a process container, and ensure we enable apptainer. Again we don’t want to hard code this decision as we’d like to keep options as flexible as possible. This is why we build a profile for each our compute environments, in this case for our local machine / GitHub codespace we have access to Docker. However, for our slurm profile, relevant to a computer cluster with Slurm workload manager, we opt for apptainer (former singularity), as docker is not available.
Task 11.3
We can declare a different config file for different compute environments, or profiles. These profiles are stored under the conf sub-folder.
- The Docker Hub is an online repository of container images.
- Find a container recipe file that works for your project and customise this.
- Nextflow can pull a docker container from Docker Hub and convert this to an Apptainer image.
- Docker is not permitted on most HPC environments, apptainer sif files are used instead.
- Containers are important to reproducible workflows and portability of workflows across environments.
Content from Resuming a Workflow
Last updated on 2025-07-05 | Edit this page
Overview
Questions
- How can I restart a Nextflow workflow after an error?
- How can I add new data to a workflow without starting from the beginning?
- Where can I find intermediate data and results?
Objectives
- Resume a Nextflow workflow using the
-resumeoption. - Restart a Nextflow workflow using new data.
A key feature of workflow management systems, like Nextflow, is re-entrancy, which is the ability to restart a pipeline after an error from the last successfully executed process. Re-entrancy enables time consuming successfully completed steps, such as index creation, to be skipped when adding more data to a pipeline. This in turn leads to faster prototyping and development of workflows, and faster analyses of additional data.
Nextflow achieves re-entrancy by automatically keeping track of all the processes executed in your pipeline via caching and checkpointing.
Task 12.1
To restart from the last successfully executed process we add the
command line option -resume to the Nextflow command.
How does resume work?
Nextflow stores all intermediate files and task results during the
execution of a workflow is work directory. It acts as a
scratch space where all the temporary data required for the workflow’s
execution is kept. Within the work directory, Nextflow creates
subdirectories named with unique hashes (e.g., work/ab/cd1234…). Each of
these subdirectories corresponds to a specific process or task in the
pipeline. The hashed directory names ensure that each task’s outputs are
isolated and uniquely identified.
The mechanism works by assigning a unique ID to each task. This
unique ID is used to create a separate execution directory, within the
work directory, where the tasks are executed and the
results stored. A task’s unique ID is generated as a 128-bit hash number
obtained from a composition of the task’s:
- Inputs values
- Input files
- Command line string
- Container ID
- Conda environment
- Environment modules
- Any executed scripts in the bin directory
When we resume a workflow Nextflow uses this unique ID to check if:
- The working directory exists
- It contains a valid command exit status
- It contains the expected output files.
If these conditions are satisfied, the task execution is skipped and the previously computed outputs are applied. When a task requires recomputation, ie. the conditions above are not fulfilled, the downstream tasks are automatically invalidated.
Therefore, if you modify some parts of your script, or alter the
input data using -resume, will only execute the processes
that are actually changed.
The execution of the processes that are not changed will be skipped and the cached result used instead.
This helps a lot when testing or modifying part of your pipeline without having to re-run it from scratch.
The Work directory
By default the pipeline results are cached in the directory
work where the pipeline is launched.
Task execution directory
Within the work directory there are multiple task
execution directories. There is one directory for each time a process is
executed. These task directories are identified by the process execution
hash. For example the task directory
fa/cd3e49b63eadd6248aa357083763c1 would be location for the
process identified by the hash fa/cd3e49 .
The task execution directory contains:
.command.sh: The command script. The.command.shfile includes the specific instructions you’ve written to process your data or perform computations..command.run: A Bash script generated by Nextflow to manage the execution environment of the.command.shscript. This script acts as a wrapper around .command.sh. It performs several tasks like setting up the task’s environment variables, handling the task’s pre and post execution (like moving inputs and outputs to correct locations, logging start and end times, handling errors, and ensuring resource limits are respected.command.out: The complete job standard output..command.err: The complete job standard error..command.log: The wrapper execution output..command.begin: A file created as soon as the job is launched..exitcode: A file containing the task exit code. This file is used to capture and store the exit status of the process that was run by the .command.sh script.Any task input files (symlinks)
Any task output files
Specifying another work directory
Depending on your script, this work folder can take a lot of disk
space. You can specify another work directory using the command line
option -w. Note Using a different work
directory will mean that any jobs will need to re-run from the
beginning.
Clean the work directory
Supply the option -n to print names of files to be
removed without deleting them, or -f to force the removal
of the files. If you only want to remove files from a run but retain
execution log entries and metadata, add the option -k.
Multiple runs can be cleaned with the options, -before,
-after or -but before the run name. For
example, the command above would remove all the temporary files and log
entries for runs before the run.
- Nextflow automatically keeps track of all the processes executed in your pipeline via checkpointing.
- Nextflow caches intermediate data in task directories within the work directory.
- Nextflow caching and checkpointing allows re-entrancy into a workflow after a pipeline error or using new data, skipping steps that have been successfully executed.
- Re-entrancy is enabled using the
-resumeoption.
Content from Portability of Workflow
Last updated on 2025-06-29 | Edit this page
Overview
Questions
- How can I move my analysis to a computer cluster?
Objectives
- Discuss ways to implement own research directory.
- Explore links to the wider network for computational researchers.
Workflow managers support portability of analysis across compute environments and scale your analysis. This is quite important given the time required to set-up from scratch and work the ropes of using HPC. A good number of HPCs rely on workload managers like Slurm, including the resources I access as a PGR student, at the MVLS school, University of Glasgow. Some the following may map on to the resources you can access to support your research. Please contact your HPC administrator team to request support with setting up.

Once you register an account with your HPC resource, the most straightforward way to install Nextflow is by creating a stand-alone ‘environment’ using the software management tool, conda.
You may require support with this step, please get in touch with your HPC support team. You will also require singularity / apptainer - to set up a container to run your project. Check whether this is already installed, if not please request further support from your HPC team.
Task 13.1
Installing Nextflow is required to run the pipeline. Note this is a different level of abstratction to the auxiliary tools you may are likely to access within your pipeline, i.e docker or apptainer. The more straightforward way to install the Nextflow software and dependencies is to set up a conda environment. Conda or miniforge is commonly made available on compute clusters, as it simplifies downloading software.
conda create --name nf-env bioconda::nextflow
Activate the conda environment.
conda activate nf-env
Install graphviz if you would like to render reports and a timeline for the workflow. May not work if you don’t have elevated permissions, but likely to work on you local machine.
sudo apt install graphviz
Hint: You will need to activate the environment each time you need to use it. You will know you have entered the environment whenever you see the name of the environment appear in parentheses (nf-env) along your command line. The default, i.e no environment is (base).
We saw various different profiles are used to define nextflow configuration profiles to determine how a workflow is actually run on the target system.
If not otherwise specified, processes are run on the local computer. The local runtime is very useful for pipeline development and testing purposes, but for real world computational pipelines an HPC or cloud platform is often required.
You may require support with this step, please get in touch with your HPC support team. You will also require singularity / apptainer - to set up a container to run your project. Check whether this is already installed, if not please request further support from your HPC team.
We can seamlessly transfer analysis from your computer, a grid platform, or the cloud, without modifying it, by simply defining the target platform in the configuration file. This is where our workflow management system shines through and ensures we can build portability and interoperability into our analysis.
Task 13.2
This is specific to SLURM, the workload manager, and involves a batch job submission. Essentially, this command asks for resource for nextflow to schedule a series of jobs and orchestrate the moving parts of our analysis.
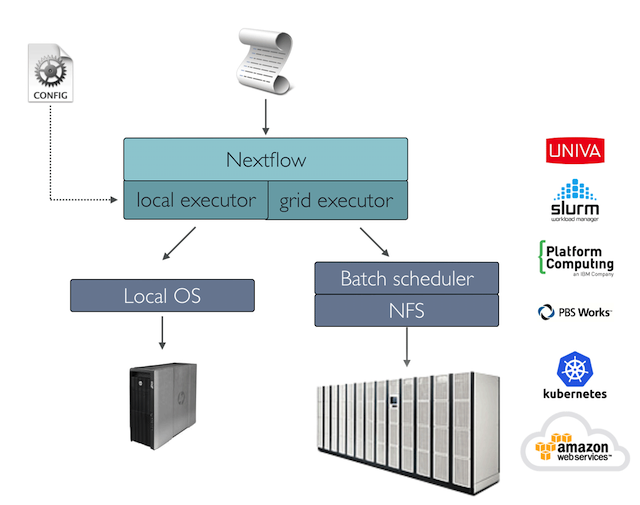
Alas, we can tap into the seamless portability of Nextflow across set
ups (ex. local, slurm, azure). You can switch between these compute
environments by selecting an appropriate profile to run your pipeline.
The appropriate profile in my case was slurm, you can tuck
away this set-up information by creating a new profile in the
conf/ subfolder (ex. conf/slurm.config). Then
the command I would use to schedule the launch of the pipeline say using
2 hours and 5 minutes would involve the following:
BASH
git clone --branch ready-set-workflow --single-branch https://github.com/omiridoue/sgsss-workflow.gitBASH
sbatch -A none -J "demo" --time=02:05:00 --wrap 'nextflow run /mnt/scratch/users/<username>/sgsss-workflow/main.nf -profile slurm'Hint: replace the file path to your sgsss-workflow/main.nf file with the appropriate directory on your computer cluster.
BASH
sacct --starttime 2025-07-10 --format=User,JobID,Jobname%50,partition,state,time,start,end,elapsed,MaxRss,MaxVMSize,nnodes,ncpus,nodelistAn important detail to note is, the time we request to run our batch
job submission is not necessarily the time required to run the entire
pipeline. The reason for this is that sbatch schedules our
jobs to run via nextflow. This means you can max out time permitted to
run your batch submission, to ensure all jobs are submitted within this
time frame. For any jobs submitted within the timeframe but not
scheduled to complete, there is no problem you can prevent a possible
‘time-out’ by specifying
export NXF_DISABLE_JOBS_CANCELLATION=true to add this to
your system variables.
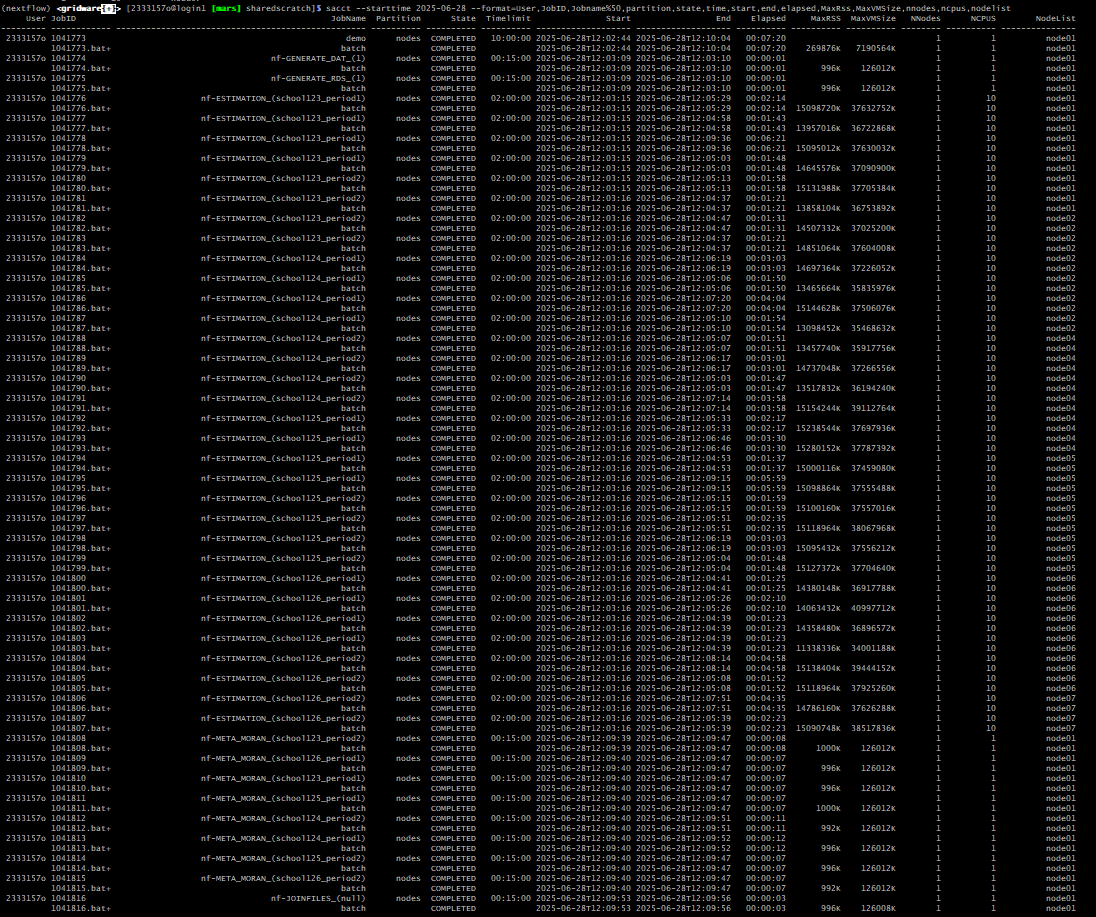
- Nextflow provides an abstraction between the pipeline’s functional logic and the underlying execution system.
- The nextflow configuration file can help define a target platform where we intend to implement our workflow.
- We can specify a profile for our target platform through the
-profileoption.